|
|
 |
|
| Related pages: Digital cameras | Digital vs. film | The Canon EOS-10D Digital SLR |
Prints made from images captured on digital cameras can have extraordinary tonal quality, comparable to the finest full-toned traditional prints. But to reach their full potential they must be processed properly, which involves changing default camera settings and moving away from standard file formats. This page covers the key steps for achieving ultimate tonal quality, which include,
| This page shows you how to obtain optimum tonal quality from your digital camera and how to take advantage of its hidden dynamic range. |
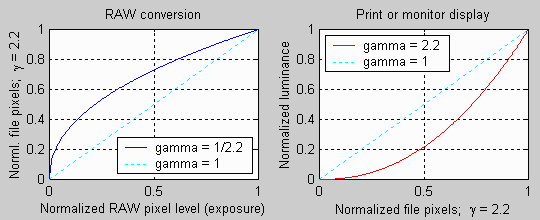
Output luminance = (pixel level)gammaTo obtain the pixels, the raw output of the image sensor, which is proportional to exposure, must be converted to a file with a standard color space using the inverse of the above operation.
pixel level = (RAW pixel level)1/gamma ~= exposure1/gammaGamma is the exponent of the equation that relates luminance to pixel level. Every color space has a characteristic gamma. Gamma = 2.2 for sRGB, which is the default color space for Windows, the World Wide Web, and most digital cameras. sRGB has a color gamut that approximates typical CRT monitors. Another popular color space is Adobe RGB (1998), which has a slightly larger color gamut. It also has gamma = 2.2. ( Older Macintosh computers have a default gamma of 1.8, but newer models seem to have switched to 2.2.) In the illustration below, the first process-- converting light energy (RAW data) to file pixels-- is shown on the left. The second process-- converting file pixels to print or display-- is shown on the right. The two processes are complimentary; when you combine them you get a straight line.
| Figure 1. Characteristic curves for
the two
conversion processes in digital printmaking. |
 |
|
| File pixel level (normalized to
1) as a function of exposure (raw pixel levels). |
Output luminance (print or
monitor) as a function of normalized file pixel levels. |
|
| Both shown with linear scales. The same data is displayed with logarithmic scales in Fig. 3. | ||
Gamma correction is one of several functions of RAW conversion-- the process of converting the output of an image sensor to a standard file format, such as JPEG or TIFF. Depending on your camera's Storage or Quality setting, RAW conversion takes place inside the camera, immediately after the exposure, or afterwards on a computer.
It should be evident from these graphs that RAW conversion compresses pixel levels representing high luminance and expands pixel levels representing low luminance. This means that the converted file, with gamma = 2.2, has relatively fewer pixel levels in the highlights and more in the shadows. This turns out to be an advantage when human vision is considered.
RAW conversion performs several additional functions.
The remainder of this page will show how performing RAW conversion on a computer, rather than in the camera, enables you to achieve optimum tonal quality.
Delta L/L = 0.01(G. Wyszecki & W. S. Stiles, "Color Science," Wiley, 1982, pp. 567-570). This is a relative difference of 1%, corresponding to 1/70 of an exposure zone. (1.0170 = 2.0.)
In a photographic print, which has about a 100:1 luminance ratio, the eye can distinguish between 100 and 200 discrete luminance levels-- fewer than the 256 available in 8-bit B&W or 24-bit color. Assuming 200 levels, this is an average of 30 discrete visible steps in each of the 6.6 zones that comprise the 100:1 luminance ratio-- fewer than the 70 indicated by the Weber-Fechner law. The reason for the discrepancy is that the eye distinguishes fewer luminance levels in the dark areas of a print due to visual interference-- mostly flare light-- from the light areas. The number of luminance levels the eye can distinguish decreases gradually from light to dark zones.
In a RAW, i.e., linear file, the pixel level is proportional to light intensity. An exposure change of one zone or f-stop involves halving or doubling the pixel level. Therefore, half the pixel levels are in the top (brightest) zone, a quarter are in the second zone, a fourth are in the third zone, etc. A linear file with a bit depth of 8 (256 discrete levels) would contain 128 levels in the top zone, 64 levels in the second, and so on. The top zone would have far more levels than the eye can distinguish, while the lower zones would have relatively few levels-- only 8 and 4 in zones 5 and 6, respectively. "Banding" would be visible in shadows. If much editing were applied to the image-- if shadow areas had to be lightened (dodged) or increased in contrast, the banding could become severe. In a color space with gamma = 2.2, the distribution of levels is much more uniform: there are 69 levels in zone 1 (close to Weber-Fechner's magic number), 50 in zone 2, and so on. Zone 6 would still have 14 levels. Banding is invisible unless considerable editing is applied. Gamma = 2.2 may well be the ideal value for files with a bit depth of 8 (8-bit B&W and 24-bit color).
RAW (linear) and converted (gamma = 2.2) levels are shown in Table 1 for eleven zones of decreasing luminance, numbered 1 through 11. Columns 2-6 are for RAW (unconverted) data. The brightest Normalized level in each zone, 1/2n-1 = {1, 0.5, 0.35, ...} is shown in column 2 and the fraction of available levels, 1/2n = {0.5, 0.25, 0.125, ...} is shown in column 3. The total number of levels for RAW files from 10, 12, and 14-bit A-to-D converters is shown in the columns 4-6. Most current digital SLRs have 12-bit A-to-D converters. The rightmost five columns are for color spaces with gamma = 2.2. The rightmost two columns show the number of levels in each zone for 8 and 16-bit depths, representative of 24 and 48-bit color files.
|
|||||||||||||||||||||||||||||||||||||||||||||||||||||||||||||||||||||||||||||||||||||||||||||||||||||||||||||||||||||||||||||||||||||||||||||||||||||||||||
A few things are evident from this chart.
We can gain some insight by looking at a
simple
imaging system-- a camera/printer combination that reproduces images
with
no editing or manipulation. The two gamma equations in the section on RAW
conversion are applied exactly. The contrast of the print would be
identical to the scene contrast-- a nice idea in theory, but one that
rarely
produces "fine" prints because a print can only reproduce a tonal range
of about 100:1-- 6.6 f-stops. In this case the system dynamic range
would
also be 6.6 f-stops-- well under the camera's potential dynamic range.
| The transfer curve (on a logarithmic scale) would look like
the straight
dashed blue line in Fig. 2. (Logarithmic scales correspond to human
vision
better than linear scales; they are discussed in detail below.) Camera
manufacturers are faced with a classic tradeoff: contrast
versus dynamic range. Most images look best with
enhanced
contrast, but if contrast is increased, dynamic range suffers. Dynamic
range can be increased by decreasing contrast, but images tend to look
flat. That won't sell cameras!
One way around this tradeoff is to apply a curve, shown in solid black in Fig. 2. Contrast is reduced in the shadows and highlights, but increased in the important midtone area, which is responsible for perceived contrast. |
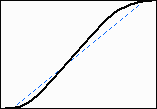 Figure 2. |
I don't know whether curves are applied in the RAW conversion algorithms used in cameras. There's no reason why they shouldn't, but if they are, camera manufacturers aren't saying. It would be part of the proprietary signal processing package that gives them a competitive advantage. Camera manufacturers could do even more-- they could make conversion adaptive. Low contrast scenes could have contrast expanded and contrasty scenes could have contrast compressed. Again, if any camera manufacturers are doing this, they aren't telling. Perhaps it will be next year's big "advance."
In the meantime you can apply curves manually with a flexible RAW conversion program like Capture One DSLR, or in an image editor. Both approaches are described below. One of the best uses of curves is to bring up dark levels that are lost when RAW conversion is performed inside the camera, as described above. This enables you to access your camera's hidden dynamic range.
The number of A-to-D converter output levels isn't the only factor that limits dynamic range. Noise is another, and it's extremely important. Unfortunately you won't find much about it in camera spec sheets or glossy brochures. It's difficult to quantify-- the amount of noise depends on the exposure and ISO speed, and it has a spectral distribution-- it's not a simple number. But it has a few important properties.
Although I repeatedly stress the importance of saving files in RAW format, there are instances where high quality can be achieved using JPEGs. Claude Jodoin of Michigan uses JPEGs for weddings and other high volume events. RAW conversion is too slow for his workflow. He uses high quality lighting, an ExpoDisc to set the White Point, and he knows how to expose properly, so images look good straight out of the camera. The bottom line is satisfied clients. This doesn't work well for landscape photography, where lighting is uncontrolled and scene contrast varies all over the place.
For this reason it makes sense to use logarithmic curves to display the relationships between exposure, film density, pixel level, and luminance. This is routinely done for film and papers, where Film Density (-Log10(transmitted light/incident light)) plays the same role as pixel level in digital images. Note that one unit on a Log10 scale (such as Density) equals 3.32 exposure zones (f-stops); one exposure zone equals 0.301 Density units.
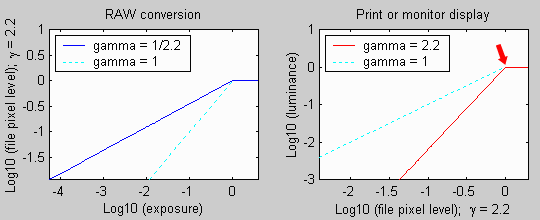
When the conversion curves in Fig. 1 are
replotted
on logarithmic scales, the characteristic curves become straight lines:
If y = xgamma, then log(y) = gamma * log(x).
Gamma is the slope
of the line; it is the change in the dependent variable (y-axis) for a
given change in the independent variable (x-axis). Using the RAW
conversion
plot in Fig. 3 as an example, gamma is the change in Log (pixel level)
for a given change in Log (exposure). In other words, gamma
is contrast.
| Figure 3. Characteristic
curves for
the two
conversion processes in digital printmaking. Both are displayed with logarithmic (base 10) scales. In contrast to the linear display in Fig. 1, the transfer curves are straight lines. |
 |
|
| File pixel level (normalized to 1) as a function of exposure (raw pixel levels). | Output luminance (print or monitor) as a function of normalized file pixel levels. | |
The equivalence of gamma with contrast becomes
strikingly apparent when we compare Fig. 3 to film and paper
characteristic
curves in Fig. 4. The RAW conversion plot (Fig. 3, left) is similar to
the film curve (Fig. 4, left) and the print/monitor display curve (Fig
3, right) is similar to the photographic paper curves (Fig. 4, right).
Log (pixel level) is analogous to Density = -Log
(light transmission) in the film plot and Log exposure in the paper
plot.
Reflection density is the same as -Log
(luminance).
The average slope of the film and paper curves is called "gamma;" it is
indeed the same gamma used to characterize digital color spaces and
monitors.
| Figure 4. Characteristic curves for the two conversion processes in conventional photographic (darkroom) printmaking. |
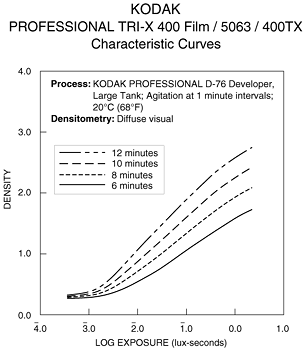 |
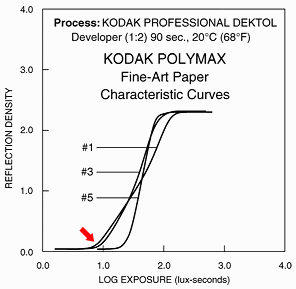 Print reflection density = -log10(fraction of light reflected by the print) as a function of log exposure (-film density). |
| The principal difference between the digital and conventional curves is in the "knee" regions near the response limits. The knees tend to be more abrupt for digital. | ||
|
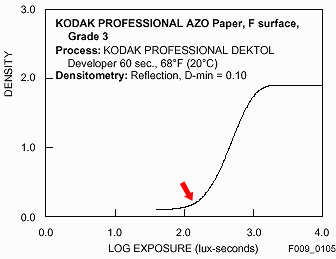
What follows may seem a bit strange;
please bear
with me. Fig. 5 is the curve for Kodak
Azo paper-- a silver chloride contact printing paper with an
exalted
reputation for fine tonal quality. Michael
A. Smith and Paula Chamlee-- print quality fanatics in the Edward
Weston/Ansel
Adams tradition (they use 8x10 and
8x20 inch cameras)-- rave
about it.
"In our opinion, we have not seen contemporary photographic prints on any other photographic paper, including all platinum and other "alternative" papers, that consistently rival the depth, luminosity, and tonal range of photographs printed on Azo paper."Unless you plan to swap your DSLR for an 8x10, take a careful look at the curve. It's different from the Polymax curve in Fig. 4 and strikingly different from the digital camera curves in Fig. 3. |
|
The key difference is in the knee of the curve, indicated by the red arrow-- the highlight region where density starts increasing. The knee is much broader for Azo than for Polymax-- density increases more gradually. The knees in both film curves are in stark contrast to the digital curves in Fig. 3, which cut off abruptly at their limits. (The polarities of several parameters are reversed; the corresponding knee in Fig. 3, such as it is, is indicated by an arrow in the upper right.) Thanks to the knee, Azo holds highlight detail very nicely. It doesn't easily burn out. The knee gives Azo its superb luminosity. (Luminosity refers, of course, to highlights.)
The knee is not there by accident. It's the climax of an evolution that has spanned several generations of silver-based paper (and photographers as well). Digital printing has evolved enormously in the last decade, but it's still the new kid on the block. There are still some rough edges, or perhaps... sharp corners.
Digital photographers need not despair. The effects of the "knee" can be duplicated by Curve controls using one of two approaches.
And there's one more difference with digital. You can fine tune the curve to match the needs of the image, precisely. You aren't limited by the curve of the paper. (In my old B&W darkroom days I would to adjust the curve by mixing standard and low contrast paper developers-- Dektol and Selectol Soft. Digital curves are easier.)
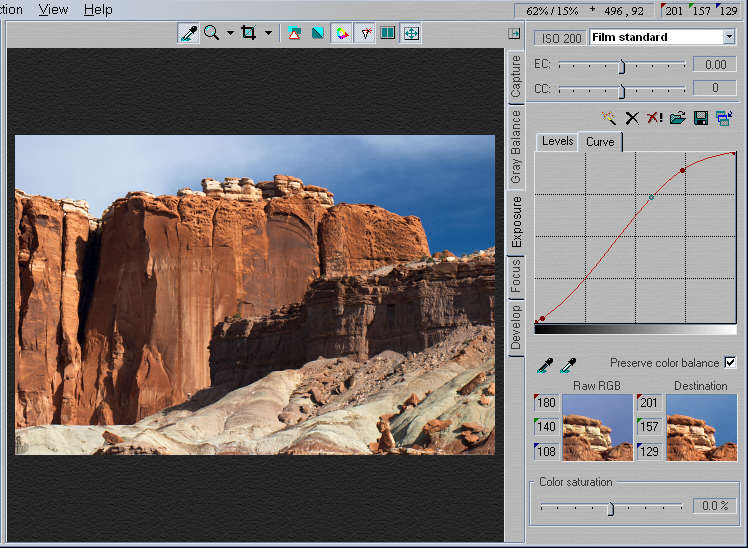
Figure 6. Capture One LE Exposure tab.
|
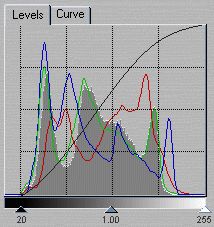
Figure 7. C1 LE Levels tab with histogram
The histogram, visible when the Levels tab is selected, is shown in
Fig.
7. The levels tab allows you to set the minimum and maximum pixel
levels.
I moved the minimum from its default of 0 to 20 but didn't change the
maximum--
I used the Curve for that adjustment. To adjust the curve you need to
select
the Curve tab, as illustrated in Fig. 6. The curve I chose is quite
similar
to the Azo curve-- recall that polarities are reversed, so the lower
left
of the Azo curve corresponds to the upper right of the C1 LE curve.
There's
nothing rigid about the Azo curve; I choose whatever curve (or straight
line) works best with each individual image. |
 |
| Ed Harris's workflow for expanding tonal range | |
|
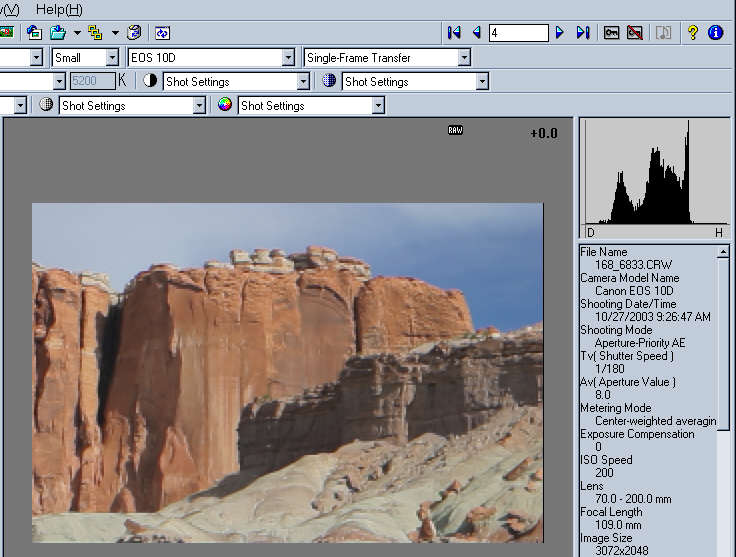
Figure 8. Canon File Viewer Utility
Despite the weaknesses in its interface, the Canon File Viewer Utility does a decent job in converting the RAW image. And if you convert to 48-bit color you can edit with no loss of tonal levels. Fig. 9 illustrates how to edit the image with the Color curves transformation in Picture Window Pro.
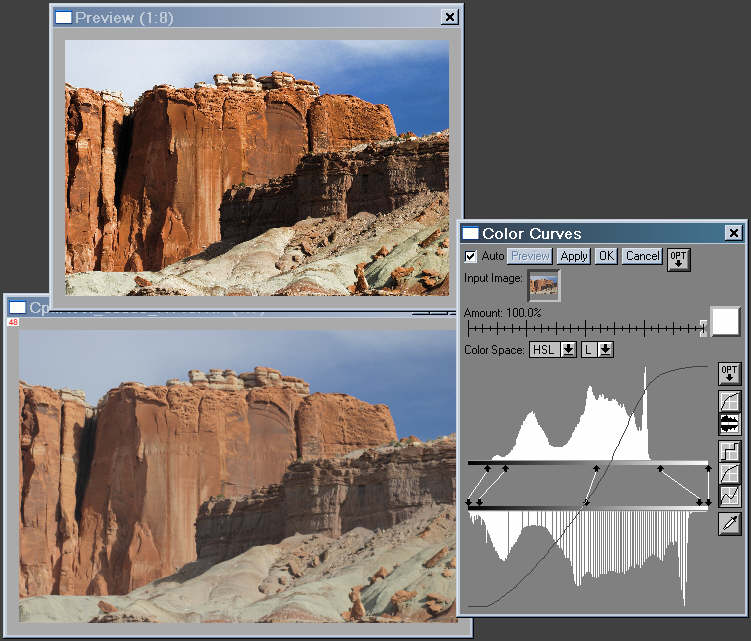
Figure 9. Picture Window Pro Color
Curves transformation.
The original image-- the anemic output of the
Canon File Viewer Utility-- is on the lower left. The preview image is
on the top. The Color Curves control box is on the right. I especially
like the way it combines the curves adjustment with a histogram-- it
gives
exceptional control. The curves behave differently from Capture One LE,
but the overall result is similar. I used the HSL
color representation, which tends to increase saturation as lightness
(L)
is decreased. I also boosted the Saturation (S) (not visible here).
There
are gaps in the lower (result) histogram because the preview uses
24-bit
color. The gaps aren't present in the histogram of the 48-bit
transformed
image (Fig. 10, right). But they are present when the same Color Curves
transformation is performed on an identical 24-bit color image (Fig.
10,
left) More information on using the Color Curves transformation can be
found in Digital Light and Color's
tutorial,
Using
Curves and Histograms (a 1.34 MB PDF download).
.
| The loss of tonal detail is obvious in the histogram on the left, though it's probably not severe enough to cause serious banding. But if you apply multiple edits-- if you do much selective tonal control (dodging and burning), the degradations will accumulate. The tonal gradation of the final image won't be as smooth as it could be. And of course, this image, like most landscapes, can benefit from additional work. It’s by no means complete at this stage. |
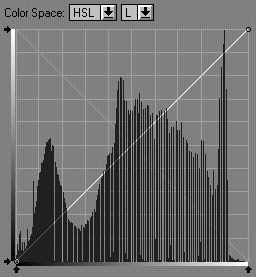 24-bit color (bit depth = 8) |
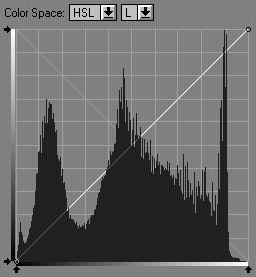 48-bit color (bit depth = 16) |
|
|
||
| All digital cameras and most photographic printers are
designed for
color: it takes effort and imagination to turn images into Black &
White. What a contrast to my youth, when color was almost impossibly
difficult
in the home darkroom! B&W is a more abstract medium; it's not as
closely
tied to reality. B&W prints typically require and tolerate more
manipulation--
dodging and burning. Read Ansel Adams' "The Print" if you're skeptical.
The results can be striking-- very different from color. And the tones
can be gorgeous.
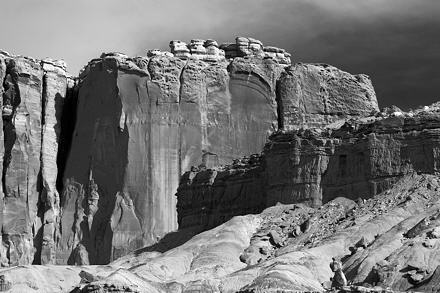
To convert the image into B&W I used Picture
Window Pro's Monochrome transformation, which allows you to select
and preview a filter of any color. I describe its use in my page on Black
& White. I used a red-orange filter because pure red was a
little
harsh. I also did some tonal manipulation and contrast masking. In some
ways I prefer the B&W image. |
|
Newer printers such as the Epson 2200, which has both black and gray ink cartridges, do an excellent job with B&W, though glossy surfaces still can't quite match the finest silver prints. (However, matte surfaces whip their silver counterparts.) They do even better if you use a piece of software called a Raster Image Processor (RIP) to control the ink mixture. With an RIP you can minimize metamerism-- changes in the appearance of the print under different light sources, which are much more noticeable in B&W prints than in color.
Related pages: Digital
cameras | Digital vs. film | The
Canon EOS-10D Digital SLR
.
| IImages and text copyright (C) 2000-2013 by Norman Koren. Norman Koren lives in Boulder, Colorado, where he worked in developing magnetic recording technology for high capacity data storage systems until 2001. Since 2003 most of his time has been devoted to the development of Imatest. He has been involved with photography since 1964. |  |