Making fine prints in your digital darkroom
Monitor calibration and gamma
by Norman Koren

| |  |
|
In this page we discuss a critical step in setting up a digital darkroom: calibrating your monitor so it conforms to widely-accepted standards of image display. A properly calibrated monitor is essential for making prints that match the monitor image; it is an absolute necessity for success in the digital darkroom. Printer calibration is now on a separate page.
This page makes little mention of color
management-- a set of tools and
techniques that enable you
to achieve optimum monitor/print matching and make prints with
nonstandard
inks and papers. You don't need it to get started. It involves a
learning
curve, but it's simple to use once you've mastered it. Otherwide it's
error-prone.
I now use a fully color-managed workflow.
| Related pages: | Printer calibration discusses how to get your prints to match your monitor image. |
| Background to monitor calibration covers some background areas related to gamma. We discuss why a new chart was needed (many old ones had an error), then we present two additional charts: one for three luminance levels, one for three colors (R, G, B). We illustrate what luminance steps look like for different gamma settings, then discuss pages by Timo Autiokari, which contain some dubious advice about gamma. This material on this page is for reference; it's not essential reading. | |
| Color management Sooner or later you'll have to face it if you want to make the finest possible prints. |
| Monitor size and resolution settings | ||||||||||||||||||||||||||||||||||
|
| A good
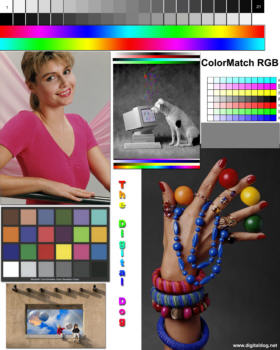
test image is useful for evaluating your monitor's
quality and
calibration as well as the match between the monitor and printer. I
found
a nice image on The Digital Dog's website. Go to https://www.digitaldog.net/tips/index.shtml
and shift-click or right-click on Printer
Test File. Winzip (or a similar utility) must be
installed on your system to
turn this file, whose default name is Printer
Test file.jpg.zip,
into a JPEG. The 1600x2000
pixel
image,
shown greatly reduced on the right, includes a portrait with good skin
tones, color and grayscale step charts, and the Gretag
Macbeth® ColorChecker color rendition chart. (Bruce
Lindbloom hasColorChecker RGB
values for various color spaces-- sRGB, Adobe 1998, etc.; Babelcolor
(Danny Pascale) has an outstanding description of the
ColorChecker.) While you're at Digital Dog's site, check out his many
excellent articles and tutorials. [Color management information: The file has an embedded ICC profile tag for Apple ColorMatch color space (gamma = 1.8). In non-ICC aware applications, or in ICC-aware applications with color management turned off, this tag is simply ignored. No problem. But if you are using color management you must be aware of it. You should use an ICC printer profile rather than Color Controls settings, as described below. Why? Because when color management is enabled, there is a translation between the file color space and the monitor (display) color space. Other files, without profiles or with different profiles, translate differently. The Color Controls settings ignore the profiles-- no translation takes place; the relationship between print and monitor appearance won't be consistent. But all will be well if you use an ICC printer profile (that's what they're for). I don't recommend converting to another color space, though simply removing the profile tag doesn't do much damage (the Gretag Macbeth Colorcheker displays slightly dark).] |
 |
| Another standard test image (below, right) originated with
PhotoDisc,
Inc., which has been absorbed into Getty
Images (no connection with the Getty
Museum). They have a nice page of articles
on color theory and management. A 10 MB (large)
high quality JPEG of this image can be downloaded from Inkjetart.com--
one of my favorite sources of printing materials. The image size is 3225x5055
pixels. The colors are unsaturated (far from Velvia), apparently
because
the file data is for the Adobe RGB (1998) color space (see Color
management for an explanation of color spaces), but the file
contains
no embedded Adobe RGB (1998) profile. (Also, most web browsers do not
recognize
profiles-- they assume all images are in the default sRGB color space.)
[Color management information: The file (PDI-Target.jpg) has no embedded ICC profile tag. The file data is apparently for Adobe RGB 1998. That's why colors appear unsaturated in web browsers and image editors that assume sRGB file data. To get proper appearance-- correct saturation-- in a color managed workflow, you must add an ICC profile tag without changing the image data. In Picture Window Pro, you do this by clicking Transformation, Color, Change Color Profile..., then setting New Color Profile: to SMPTE-240M (or Adobe RGB, which is identical) and Change: to Profile Setting Only (not the default).] | 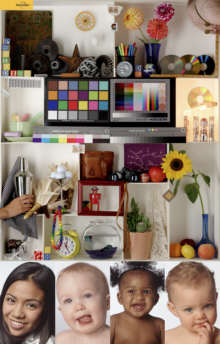 |
The same Inkjetart.com page has a very nice 2.6 MB 1080x1680 pixel TIFF test image. A 686x539 pixel test image which can be downloaded from Robyn Color Labs is shown below.
These color balance and tonalities of these images
can give you a qualitative
indication of how well your monitor is calibrated. They can also be
used
for checking
printer calibration.
|
 Gamma
describes the nonlinear relationship between the pixel levels in your
computer
and the luminance of your monitor (the light energy it emits) or the
reflectance
of your prints. The equation is,
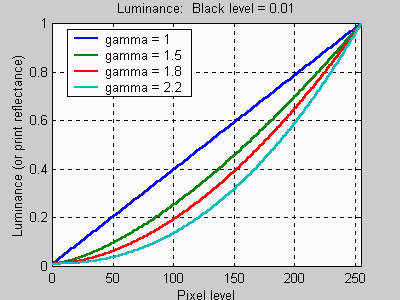
Luminance = C * valuegamma + black levelC is set by the monitor Contrast control. Value is the pixel level normalized to a maximum of 1. For an 8 bit monitor with pixel levels 0 - 255, value = (pixel level)/255. Black level is set by the (misnamed) monitor Brightness control. The relationship is linear if gamma = 1. The chart on the right illustrates the relationship for gamma = 1, 1.5, 1.8 and 2.2 with C = 1 and black level = 0.
Gamma affects middle tones; it has no effect on black or
white. If
gamma
is set too high, middle tones appear too dark. Conversely, if it's set
too low, middle tones appear too light. [Note: Film is different. Gamma
increases with development time; highlights are strongly affected.]
Gamma, as defined above, is also called display gamma-- the product of monitor's native gamma and video card lookup table (LUT) gamma. (Most video cards have LUTs.) As we shall see, it is closely related to film gamma, which is the average slope of the film response curve.
Black level
is the monitor luminance or print reflectance for value
= pixel level =
0; i.e., it is the
deepest black in the monitor or print. It is a constant that includes
the
effects of viewing flare (stray light).
In good
monitor
viewing environments it can be very small, less than 0.01, relative to
a normalized maximum Luminance of 1. It's also around 0.01 for high
quality
prints (higher for mediocre paper/ink combinations). Sometimes
black level appears inside the exponent, but it makes little difference
since it's a constant.
|
 The
eye doesn't respond linearly to light; it responds to relative
brightness
or luminance differences. The
smallest luminance
difference the eye can distinguish in bright light (Delta L)
is
expressed by the Weber-Fechner law,
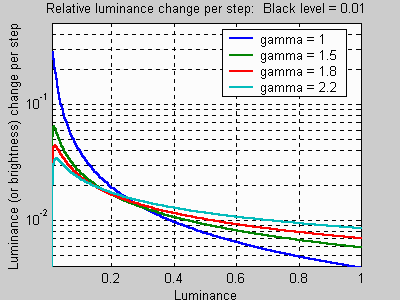
Delta L/L = 0.01 = 1%(G. Wyszecki & W. S. Stiles, "Color Science," Wiley, 1982, pp. 567-570). Most video cards display 8 bits per color (256 levels), even if you store and edit in 16 bits per color channel. With gamma = 1, the relative luminance difference at the highest luminance levels would be less than 0.004 (1/256)-- much less than the eye can distinguish, but it increases rapidly for lower levels. In dark areas it can be large enough to cause perceptible banding between levels. This can be corrected by applying a gamma curve, as illustrated in the graph on the right, which shows the relative luminance difference between pixel levels for gamma = 1, 1.5, 1.8, and 2.2. The relative difference is most consistent for gamma = 2.2. It remains under 0.01 at high brightness levels, but it is lower than gamma = 1 for luminances under 0.2.
Relative differences are not displayed uniformly when luminance is plotted on a linear scale, but they are on logarithmic scales: relative differences such as doubling or halving the luminance (changing it by one exposure zone) occupy the same distance, independently of the absolute level.
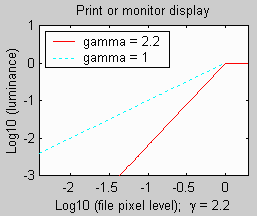 A
deeper insight into the meaning of gamma can be gained by looking at a
logarithmic plot of Luminance vs. Pixel level.
If we take the logarithm of both sides of the luminance equation,
above,
and neglect black level (set it to zero), the equation becomes log(Luminance)
= log(C * valuegamma)
= log(C)
+
gamma * log(value).
In
a logarithmic plot, gamma becomes the slope of a straight line,
as illustrated on the left for gamma = 1 and 2.2. Now compare this plot
to photographic paper, on the right.
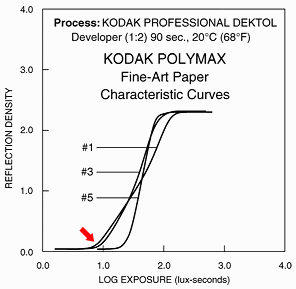 For
photographic film and paper, gamma is defined at the average slope of
the
response curve in its linear region. As we can see in this diagram for
Kodak Polymax photographic paper, higher contrast corresponds to a
steeper
slope-- higher gamma. In comparing these two plots, note that the
independent
variable, Log10(Exposure) corresponds to Log10(Pixel
level), while Log10(Luminance) corresponds to -Density.
(Both slopes are positive because the paper is a negative
material.)
One unit on a Log10 scale (such as Density)
equals 3.32
exposure
zones (f-stops); one exposure zone equals 0.301 Density units.
Comparing these two plots should make it clear that gamma in film is essentially the same as gamma in monitors: it is the slope of the characteristic curve that relates Density (-Log10(Luminance)) to the independent variable. In other words,
Gamma is contrast.The Contrast control on monitors and television sets is actually brightness, and the Brightness control is, as we've seen, black level. The nomenclature is confusing but deeply entrenched. In television sets operating in typical viewing conditions, where high ambient light limits the visible dynamic range, the Contrast control affects the apparent contrast.
The native gamma of monitors-- the relationship between grid voltage and luminance-- is typically around 2.5, though it can vary considerably. This is well above any of the display standards, so you must be aware of gamma and correct it.
A display gamma of 2.2 is the de facto standard for the Windows operating system and the Internet-standard sRGB color space. The standard for Mcintosh and prepress file interchange is 1.8. Video cameras have gammas of approximately 0.45-- the inverse of 2.2. The viewing or system gamma is the product of the gammas of all the devices in the system-- the image acquisition device (film+scanner or digital camera), color lookup table (LUT), and monitor. System gamma is typically between 1.1 and 1.5. Viewing flare and other factor make images look flat at system gamma = 1.0. To learn more, go to links.
| |||||||||||||||||||
|
| To
calibrate your monitor, i.e., to adjust gamma with any of
the following
techniques, your video card should have a Lookup
Table (LUT).
Most recent video cards have one. QuickGamma
displays a pop-up message if no LUT is found. If your video card
doesn't
have one, it's ancient; replace it with a new one. It doesn't have to
be
expensive or fast. 8 MB is the minimum video memory. 16 MB is faster
for
switching between screens. Most cards have more. There are two basic approaches to adjusting gamma: the Visual approach, which uses a special pattern, and the Calibrator approach, which uses a colorimeter or "SpyderTM." The ColorVision Spyder is shown on the right. The two approaches are compared in the table below. | 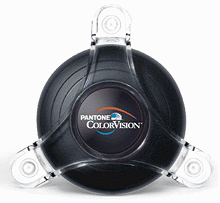 |
| Approach | Visual | Calibrator |
| Advantages | It's free! And it can do a good job of calibrating most monitors. | Extremely accurate. Produces monitor profiles for use with color-managed workflows. |
| Programs | QuickGamma
(below):
an excellent little utility. Recommended. Adobe Gamma: included with Photoshop. Monica: a nice Linux utility. Video card software: doesn't require the installation of a new program, but can be inconvenient. | Calibrators
are
designed
to work accompanying calibration software. Examples:
MonacoEZColor ColorVision (PhotoCAL, OptiCAL) GretagMacbeth Eye-One Display Some of these programs can perform an optional Visual calibration if a calibrator is unavailable. |
| Comments | Can achieve excellent results if your monitor is well-behaved, i.e., if its luminance is proportional to (pixel level)gamma_native. If its response is irregular-- due to aging or malfunction-- you'll need a calibrator (or a new monitor). | Can achieve excellent results with a wider range of monitors-- the curves entered in the LUT can be more complex than the simple exponentials used with the Visual approach. |
| You can set your monitor to 6500K (or sRGB, which is 6500K), but accuracy may be poor. This is rarely a major issue because the eye adapts when it moves from the monitor to the print, which is typically displayed at 5000K or lower. If the Monitor test pattern appears to be neutral gray on the monitor, it's fine; you'll be able to match prints. If it has a color tint you'll need to get a calibrator (or a new monitor). | You can calibrate the monitor's white point to exactly 6500K. This is not a major advantage. See comments on the left. | |
| Not ideal for color management, but you can achieve respectable results using sRGB as the Windows default monitor profile. | Best for color management because you'll get a monitor profile that represents the true performance of your monitor (which is close to sRGB for typical CRTs). |
| If you are
starting out I recommend
the visual
approach. It's fast, simple, and provides good results in most cases. QuickGamma
is a particularly nice little Windows utility for visual calibration. (Monica
is a comparable Linux program.) You can
verify
its accuracy with the Monitor
test
pattern. If
it is smooth neutral gray when viewed from a distance, your monitor is
well-calibrated and can't be improved by much.
If you want the ultimate in monitor-print matching or you can't get good calibration with the visual approach, get a calibrator and upgrade to a color-managed workflow. Luminous-Landscape.com and many other authors strongly recommend this approach. But the improvement over the visual approach may be modest because the Windows-default sRGB color space is close to typical CRT monitors calibrated for gamma = 2.2. My friend Miles Hecker recommends the ColorVision SpyderPROTM with OptCALTM package, which sells for $249 US. OptiCAL software is excellent and the new Spyder has seven filters instead of the usual three-- it is a true colorimeter, i.e., it can measure the human eye's response to color. This probably makes little difference for CRTs, all of which have similar phosphor responses, but it can be advantageous in calibrating LCD monitors, which can have very different spectral responses. By 2005 virtually all new monitors will be LCDs: they've gotten very good and new production capacity will drop the cost below CRTs. |
|
| Eberhard Werle of Laatzen, Germany
(near Hannover)
has written a excellent gamma calibration utility called QuickGamma
2.0 that runs on all versions of Windows starting
with 98. (Monica
is a comparable Linux program.)
The 437 kB installation program, QuickGammaV2EN.exe
(new version with bug fix, October 2004)
can be downloaded by clicking here.
Running it installs QuickGamma.exe (the main program),
QuickGammaLoader.exe
(the program that loads the LUT at Windows start), QuickGamma.chm (the
help file), and two files for easy uninstallation (using the Windows
Control
Panel). The program is also available from Eberhard's QuickGamma
site. German
and French
versions can be accessed by clicking on the appropriate flag. Although
English isn't Eberhard's native language, the Help file is clear and
concise.
If you have questions or suggestions, Eberhard's e-mail address is in
the
Help file and on the site. The right portion of the QuickGamma dialog box is shown on the right. The left portion, which consists of my gamma chart, is used to calibrate gamma and to adjust black level, which interacts with gamma. When you first load it, the gamma doesn't change. You have to click on one of the spin buttons (the up or down-arrows to the right of the Gamma box) to load QuickGamma's settings in the LUT. The number in the Gamma box increases as displayed gamma (on the chart) decreases: it indicates the monitor's native (uncorrected) gamma when the monitor is corrected to display gamma = 2.2. Version 2.0 has an option for individually adjusting gamma for Red, Green, and Blue. Unlike the color management packages (above), QuickGamma doesn't create a monitor profile. It stores the LUT values in the Windows Registry. Check the Run QuickGamaLoader at Windows Startup box if you'd like the calibration values to be loaded whenever you reboot the computer. This is
an outstanding little
program.
I strongly recommend it if you don't have a calibrator. If your monitor
is healthy
it can achieve excellent calibration, which you can verify with the Monitor
test pattern.
|
 |
| Program
package (alphabetical) |
Calibration program | Profiling capability | Calibrator | ICC
profile |
LUT loader program |
| ColorVision
OptiCAL PhotoCAL |
OptiCAL
(PhotoCAL) |
Monitor, scanner, printer. | "Spyder" | yes | OptiCAL Startup |
| GretagMacbeth Eye-One Display | Eye-One Match 2.0 | Monitor only (CRT or LCD). use the "Advanced" setting to get 6500K white point. (The "Easy" default is 5000K.) | colorimeter | yes | Logo Calibration Loader |
| MonacoEZColor | MonacoEZColor | Monitor, scanner, printer. | optional | yes | MonacoGamma |
| Profile
mechanic - monitor |
Profile
mechanic - monitor | Monitor only (CRT
or LCD).
Other modules available separately. (from the makers of PIcture Window Pro) | yes | yes | CLUT
Loader |
| Adobe Photoshop | Adobe
Gamma (run from Control Panel) | Monitor only. Creates a simple ICC profile based on your selection of gamma, white point, and phosphors. | no | yes | Adobe Gamma Loader.exe |
| QuickGamma | QuickGamma | Monitor
only;
(free; available here.)
Allows colors to be adjusted
separately. | no | no | QuickGammaLoader.exe |
| Monica | Monica | Monitor only; (free; available here.) | no | ? | (Loads
settings on startup) |
The following comments apply to the programs than create ICC monitor profiles.
Run the calibration program, following the instructions. The ICC monitor profiles are used by their respective loader programs to calibrate the monitor. Give the profile a unique name, for example, Monitor_120203.icm. It is placed in the Windows profile directory. You may be asked whether you want to make it the Windows default monitor profile. In most cases the answer is "yes."
The loader program uses data in the Windows default monitor profile to set the video card lookup table (LUT). When any of the program packages is installed, the loader program is placed in the Startup directory so it runs whenever the computer is booted. You can also run the loader program manually.
Conflicts can arise when more than one loader program may be present in the Startup directory. To see the contents of the startup directory, run the System Configuration Utility by clicking Start, Run..., and entering msconfig in the Open box. Click on the Startup tab. Only one loader program should be checked. This is a good time for a little system cleanup. Uncheck unneeded resource-hungry programs such as Microsoft's evil FindFast. Some sources of advice: Answers that work | Pacman's Portal Start Up Tips (which has an impressive list of startup programs).
To view or change the Windows default monitor profile, open the Display Properties screen by right-clicking on the Windows wallpaper (background) and clicking on Properties or by opening the Control Panel and clicking on Display. Then click on Settings, Advanced..., Color Management. The Default Monitor Profile and a set of profiles currently associated with the monitor are shown. You can add profiles to the list or set any of them as the Default.
Warning on generic monitor profiles There are some that will cause you nothing but headaches in an ICC-aware application. An example is the profile for the Sony CPD-G520 21" CRT monitor. If you go to their Monitor / Display Support web page and download the driver for the CPD-G520, you'll find a nice looking profile called Sony_d65.icm. A Trojan horse! Its TRC curves are set for gamma = 2.5; it can get you into serious trouble. More details can be found in Color management: implementation.
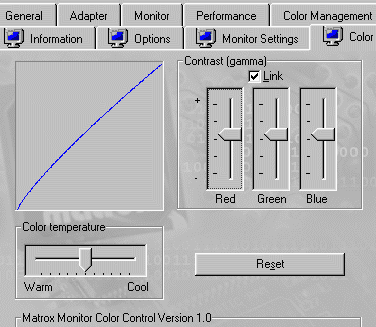 This
technique works for most video cards, but t's not my first choice. I
prefer
QuickGamma.
The dialog box on the right is for the Matrox MGA-G200 AGP video card,
which is pretty typical. Open the Display
Properties screen by right-clicking on the Windows
wallpaper
(the
background outside any open windows) and clicking on Properties,
or by opening the Control
Panel
and
clicking on Display.
Click on Settings,
Advanced...,
Color.
The default setting (which you can get by clicking on Reset)
is a straight line (R, G, B sliders centered). Click the Link
box so that all sliders move together. Display the gamma chart (above)
on your monitor, then adjust the sliders for the desired gamma (2.2 for
Windows). It's best to set your monitor to 6500K (or D65 or sRGB) and
leave
the Color temperature
slider
centered
(its default). Setting gamma with my new ATI Radeon video
card
(which
replaed the Matrox after it was fried in a power surge) is difficult
because
it doesn't allow the three (R, G, and B) sliders to be linked.
If gamma for the three color channels (R, G, and B) is inconsistent, you'll notice color variation across the chart (it should be uniform neutral gray). You may be able to correct it by unchecking Link and adjusting the sliders separately. This can be tricky because the B slider is hard to judge. The detailed charts in Background to calibration can help diagnose problems.
A source of confusion: some software indicates a
default gamma of
1.0.
This is not actual viewing
gamma; it is gamma
correction.
If you use this value you'll get the monitor's default gamma, typically
around 2.5 for CRTs. The LUT loader programs described above will
override
these settings at startup.
Printer
calibration | Background
to
monitor
calibration and gamma charts

| Images and text copyright (C) 2000-2013 by Norman Koren. Norman Koren lives in Boulder, Colorado, where he worked in developing magnetic recording technology for high capacity data storage systems until 2001. Since 2003 most of his time has been devoted to the development of Imatest. He has been involved with photography since 1964. |  |