Equipment.
Your first
concern will probably be equipment, summarized below in What
you'll need. More detail can be found in the
following pages.
|
- Scanners
(devices for digitizing film) explains scanner specifications and
describes
the different types. Includes a list of film and flatbed scanners. A
separate
page, Scanning,
describes
how
to use them.
- Digital
cameras describes the key features that affect
image quality.
Has
a table of some of the better models and links to sites with detailed
information
and reviews.
- Photo
printers describes high quality inkjet photo
printers,
particularly
the Epson Ultrachrome series (the Stylus Photo 2200, etc.).
- Canon
EOS-10D Digital SLR This outstanding 6.3 megapixel
Digital SLR
will be of particular interest to those of you shopping for a high
quality
digital camera.
- Canon
FS4000US 4000 dpi 35mm film scanner is an excellent
choice for
scanning 35mm film. Nikon and Minolta also make excellent scanners.
- Epson
2450 and 3200 flatbed scanners and their successors
(the 4870)
are excellent for medium format
and 4x5. The resolution isn't quite up to snuff for 35mm, but it keeps
improving incrementally.
|
Basic concepts. You
will need to be familiar with the concepts of light, color, and digital
imaging. Like much of this site, these pages go into
considerable
technical depth. Don't worry if you don't grasp everything at first;
you
can always return.
|
- Light
& color introduces the basic concepts of
additive and
subtractive
colors as well as the HSV and HSL color models used for image editing.
- Pixels,
images, and file formats
introduces the fundamental concepts of digital images, how their size
and
resolution is specified, and how they are stored.
- Photographic
technique covers photographic vision, cameras,
lenses, tripods,
bags, film, filters, and panoramic photography. It also has a section
on travel.
- A
simplified zone system explains how to expose film
to capture
maximum
information. (It's less relevant to digital cameras, where histograms
are used to determine exposure.)
|
Setup and calibration.
Once you have the basic equipment-- digital camera and/or scanner,
computer,
and image editing software, you will need to set it up and calibrate
it.
|
- Monitor
calibration is a critical step.
Don't
skip it!
- Printer
calibration explains how to get your
prints to match the
images on your calibrated monitor, without and with ICC color
management.
|
Image editing
is
one the
heart making fine prints, and it's probably the one that requires the
biggest
learning curve, apart from color management. As you'll soon see I'm not
a fan of Photoshop.
|
- Picture
Window Pro is a powerful program that's much less
expensive
than
Photoshop, and easier to learn and use. I describe it briefly below.
- Basic
image editing illustrates the basics of image
editing, using PW
Pro as an example.
-
Image
editing with Picture Window Pro introduces PW Pro
and
illustrates
a number of techniques, including making masks, contrast masking, and
"hand-coloring"
B&W images.
|
Going deeper.
Once
you've covered the basics you may want to explore these pages.
|
- Black
& White, matting and framing presents
workflows for
producing
excellent Black & White prints with color inkjet printers.
Includes
techniques for matting and framing prints.
- Tonal
quality and dynamic range in digital cameras explains
how to achieve ultimate tonal quality and access the hidden dynamic
range
from images captured with digital cameras.
- Papers
and inks describes specialized ink sets (mostly for
B&W)
and
fine art papers. You should start out with inks and papers recommended
by the printer manufacturer. But you may eventually want to look
further...
- Color
Management isn't necessary for beginners. You can
make very
fine
prints without it. But if you want to print on third-party fine art
papers,
refine the match between your monitor and printer, or send out image
files
to be printed, you'll need it. It involves a significant learning curve.
- Understanding
image sharpness and MTF is a series of articles
that cover a
number
of image quality-related topics, including sharpness in lenses, film, scanners,
and digital cameras,
as well as testing
lenses, depth of
field, and grain.
|
Background
reading.
|
| |

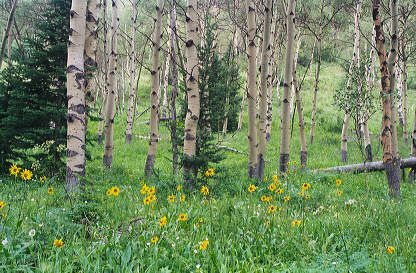
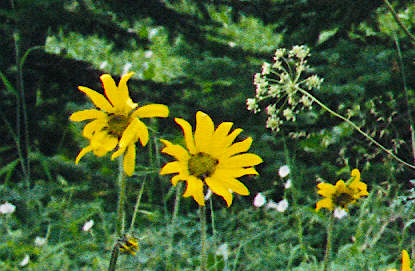
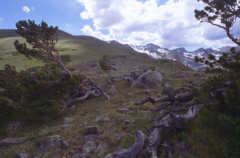
 This is
best answered with an example. The image
of aspen trees on
the Pitkin Creek trail near Vail, Colorado (above) contains nearly an
entire
35mm frame (24x36mm).
It was taken
with the Canon "New" F-1 camera, the outstanding 35mm
f/2.8 TS (Tilt-Shift) lens stopped down to f/8 or f/11 and
tilted
slightly,
a lightweight Manfrotto tripod, and Kodacolor Gold 100 film, which is sharper
than you might expect. The original was scanned on an HP
Photosmart
S20 at 2400 pixels per inch (ppi), for a total resolution is 3328x2184
pixels (defined below),
and
sharpened with
unsharp
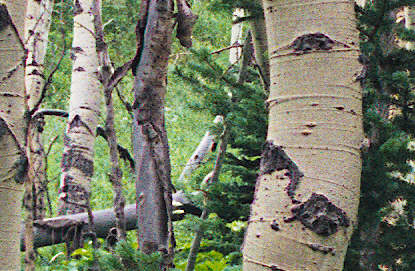
mask. The above image has been reduced by a factor of 8 to 416x273
pixels. The images on the left and below (from near the center and left
of the frame) contain 416x273
unreduced
pixels (1 screen pixel = 1 image pixel). These images span 1/8 of the
total
image lengthwise; each contains 1/64 the total image area. If the
entire
image were reproduced at a typical monitor resolution of 80 pixels/inch
(30x
magnification), it would cover
28x42 inches,
more than twice my
printer's
maximum 13x19
inch print size. A3
(11.7x16.5
inch) prints of this image are extremely sharp-- beautiful and
satisfying.
Prints from 2400 dpi scans are about as sharp as the best enlarger
(conventional
darkroom) prints; prints from properly sharpened 4000 dpi scans are sharper:
See Understanding image
sharpness, Part 2
and CanoScan
FS4000US.
This is
best answered with an example. The image
of aspen trees on
the Pitkin Creek trail near Vail, Colorado (above) contains nearly an
entire
35mm frame (24x36mm).
It was taken
with the Canon "New" F-1 camera, the outstanding 35mm
f/2.8 TS (Tilt-Shift) lens stopped down to f/8 or f/11 and
tilted
slightly,
a lightweight Manfrotto tripod, and Kodacolor Gold 100 film, which is sharper
than you might expect. The original was scanned on an HP
Photosmart
S20 at 2400 pixels per inch (ppi), for a total resolution is 3328x2184
pixels (defined below),
and
sharpened with
unsharp
mask. The above image has been reduced by a factor of 8 to 416x273
pixels. The images on the left and below (from near the center and left
of the frame) contain 416x273
unreduced
pixels (1 screen pixel = 1 image pixel). These images span 1/8 of the
total
image lengthwise; each contains 1/64 the total image area. If the
entire
image were reproduced at a typical monitor resolution of 80 pixels/inch
(30x
magnification), it would cover
28x42 inches,
more than twice my
printer's
maximum 13x19
inch print size. A3
(11.7x16.5
inch) prints of this image are extremely sharp-- beautiful and
satisfying.
Prints from 2400 dpi scans are about as sharp as the best enlarger
(conventional
darkroom) prints; prints from properly sharpened 4000 dpi scans are sharper:
See Understanding image
sharpness, Part 2
and CanoScan
FS4000US.