Understanding
image sharpness part 6:
Depth
of field and diffraction
by Norman
Koren
updated Nov. 5, 2004
In
this pagr we discuss depth of field (DOF) and deal
with such questions as, How sharp is the image at the DOF limits? Can
you
trust DOF scales? (I wouldn't.) What aperture should you choose for
optimum
sharpness when the subject spans a range of distances?
| Green is for
geeks. Do you get excited by an
elegant equation? Were you
passionate about your college math classes? Then you're probably a math
geek— a
member of a maligned and misunderstood but highly elite fellowship.
The text in green is for you. If you're normal or mathematically
challenged,
you may skip these sections. You'll never know what you missed. |
Depth
of field: introduction
So
far we've only considered images in exact focus. That's all you need
if you only photograph distant landscapes or two-dimensional objects
like
paintings. But most subjects are three-dimensional: you want to capture
objects clearly over some range of distance from near to far; hence you
need to be concerned with depth of field (DOF). The basics of DOF are
well
known: The more you stop down a lens (the larger the f-stop number),
the
larger the DOF. Wide angle lenses appear to have much larger DOF than
telephotos.
Telephotos are often used to intentionally limit DOF, for example in
portraits
where you want the subject to be in focus, but you want a distracting
foreground
or background to be out of focus. But if you read
on you'll discover telephotos don't actually have less DOF.
Most 35mm and medium format prime lenses and some zooms have
depth of
field (DOF) scales. Your camera's instruction manual states that if you
stop down your lens, for example to f/8, everything at distances
between
the two f/8 DOF marks will appear to be "in focus." Of course, not exactly
in focus. You may therefore ask the question, "How sharp is the image
(what
is its MTF?) at the DOF limit?" To answer these questions we begin with
the diagram below, representing a lens with aperture a
imaging an
object at
s on the film plane at d.
.
An
object at a distance s
in front of the lens is focused
at a distance d behind it,
according to the lens equation:
1/d
= 1/f - 1/s,
where f
is the focal
length of the lens.
If the lens were perfect (no aberrations; no diffraction) a point at s
would focus to an infinitesimally tiny point at d.
An object
at sf ,
in front of s,
focuses
at df
,
behind d.
At the film plane d, the object
would be out of focus; it
would be imaged as a circle whose diameter Cf
is called its circle
of confusion.
Likewise, an object at sr,
behind s,
focuses at
dr, in front
of d.
Its circle of confusion at d has
diameter
Cr.
The depth of field (DOF) is the range of distances
between sf
and sr, (Dr
+ Df
),
where the circles of confusion, Cf
and Cr,
are small enough so the image appears to be "in focus." The standard
criterion
for choosing C (the largest
allowable value of Cf
and Cr)
is that on an 8x10
inch print viewed at a distance of 10 inches, the smallest
distinguishable
feature is (allegedly) 0.01 inch. That was the assumption in the 1930's
when film was much softer than it is today. At 8x
magnification this corresponds to 0.00125 inches = 0.032 mm on 35mm
film,
close to the standard 0.03 mm used by 35mm lens manufacturers to
calculate
their DOF scales. If you've ever had a close look at a fine contact
print
from 4x5 or 8x10
film, you'll doubt that 0.01 inch feature size is a good criterion.
Studies
on human visual
acuity indicate
that the smallest feature an eye with 20:20 vision can distinguish is
about
one minute of an arc: 0.003 inches at a distance of 10 inches. But
inertial
prevails: 0.01 inch is universally used to specify DOF.
| Basic
Lens and Depth of Field equations. |
1/s
+ 1/d = 1/f
(1)
| f
= focal length— the lens's most important
parameter.
s =
lens-to-object distance.
d =
lens-to-film plane distance. If object
s
is located an infinite distance from the lens (s
>> f), the
image is focused at a distance f from the lens,
i.e., d =
f. |
N = f-stop = f /a
(2)
| a
= aperture diameter. |
Cf
= a|(df -d)/df
|
(3)
| Circle of
confusion at the film plane (d)
for object located at Sf
(closer than s), which
focuses on df . Derived
from simple geometry using 1/sf
+ 1/df = 1/f.
|...| denotes absolute value. |
Cr
= a|(d-dr)/dr|
(4)
| Circle of
confusion at the film plane (d) for
object located at Sr(behind s), which focuses on
dr.
Derived from simple geometry using 1/sr
+ 1/dr
= 1/f. |
| M = d/s
=
f / (s-f ) (5)
| Magnification |
| Focus = F = s+d(6)
| The focus scale
of most lenses is the distance
from the object to the film plane. >= 4*f. |
Df
= s - 1/(1/f-(1-C/a)/d)
=
sC(s-f )/(
fa+C(s-f
))
=
sCN(s-f )/(
f
2+CN(s-f
))
(7)
| Df
(front depth of field limit relative to s) derived
from (1) and
(3) using
Df
= s - sf ;
N = f-stop = f
/a
sf
= s - Df ;
Lens to front DOF limit.
There equations are in
agreement with Sushkin. |
Dr
= 1/(1/f-(1+C/a)/d)
- s
=
sC(s-f )/(
fa-C(s-f
))
=
sCN(s-f )/(
f
2-CN(s-f
))
(8)
| Dr
(rear depth of field limit relative to s) derived
from (1) and (4)
using Dr = sr
- s.
Dr
= infinity when demoninator fa-c(s-f
)
<= 0 ( f 2-CN(s-f
)
<= 0).
sr
= s + Dr ;
Lens to rear DOF limit. |
|
Sharpness
at DOF limits
How
sharp is an image with a 0.03 mm circle of confusion? Not difficult
to answer. The circle has an MTF, whose equation is derived
in the
box at the bottom (for
math geeks only). For a circle of confusion C
only
(no diffraction), the spatial frequencies for MTF =
50%, 20% and 10% ( f50 ,
f20
and f10
) are,
f50
= 0.72/C ; f20
= 1/C ; f10
= 1.11/C
f50
is familiar from
film, lenses and scanners. f20
is interesting
because it is the inverse of C.
For C = 0.03mm,
f50
= 24 lp/mm. An excellent lens
for the 35mm
format has f50 ~=
60 lp/mm.
The
sharpness at the DOF
limit for C = 0.03mm (typical for the 35mm format)
is 24 lp/mm,
about 40% of an excellent lens in focus
(60 lp/mm). Not great!
You can determine the
precise circle of confusion
C
for the depth of field scale on your lens with a simple procedure,
using
an equation derived from the box above.
 Set
the lens's focus so the infinity mark is opposite the far DOF mark for
the largest f-stop, Nmax
, typically between
f/16 and f/32. This is equivalent to setting sr
to infinity. Set
the lens's focus so the infinity mark is opposite the far DOF mark for
the largest f-stop, Nmax
, typically between
f/16 and f/32. This is equivalent to setting sr
to infinity.- Note the distance s+d
where the lens is focused.
- The circle of confusion is
C = f2/(Nmax(s-f))
~= f2/(Nmax(Focus
- 2 f)).
At this setting, s
>> f and s
>> d, so the
equation can be simplified to C
= f2/(Nmax
Focus) with little loss
of accuracy.
For example, the largest
f-stop on my Canon FD 50mm
f/1.4 lens is f/16. When the f/16 DOF mark is set at infinity the lens
is focused at 5 meters = 5000 mm (be sure to use the same units for the
lens focal length and the distance). C = 502/(16*(5000-100))
= 0.032 mm. I have found this to be typical of a large sample of Canon
FD and older Leica M-series lenses. It also holds for the 45mm lens on
my (35mm panoramic) Hasselblad XPan. |
For my
old (medium format) chrome-barrel Hasselblad (Zeiss)
lenses,
C
= 0.055 mm, corresponding to the same 0.01 inches on an 8x10
print, enlarged 5x
for this format
(nominally 6x6
cm, but actually 5.6x5.6
cm).
Zeiss has a good
deal to say
about DOF in Camera Lens News No. 1. Inadequate depth of field turns
out
to be their number one customer complaint. They state, "All the camera
lens manufacturers in the world including Carl Zeiss have to adhere to
the same principle and the international standard that is based upon it
(0.03mm
for the 35mm format), when producing their depth of
field scales
and tables." They summarize,
- "The international depth of field
standard, the basis for all
camera lens
manufacturers to calculate their depth of field scales and tables,
dates
back to a time when image quality was severely limited by the films
available."
- "Those who use depth of field scales, tables, and formulas
(e. g. for hyperfocal
settings), restrict themselves – most probably without
knowing why – to
the image quality potential of an average pre-World-War-II emulsion."
Of course the actual image sharpness at the DOF limits is
degraded by diffraction,
lens aberrations, film properties and possible lack of film flatness,
so
the overall sharpness at the DOF limits will be inevitably worse than
the
simple circle of confusion would indicate. For this reason alone, the
standard
for setting the circle of confusion is a bit loose.
The
myth of hyperfocal distance
The
focus point in the above example is called the hyperfocal
distance for f/16. When you focus at this distance, everything between
the front DOF mark (about 2.7 meters in the example) and infinity is
supposed
to be "in focus." Well, sort of. Some authors, for example, photofocus.com,
recommend focusing at the hyperfocal distance if you want a large range
of focus out to infinity.
I
don't.
Neither does Harold M. Merklinger
in his page,
Depth
of Field Revisited. Nor does Zeiss.
If the part of the scene at infinity is at all important in
the image—
it's often visually dominant— you'll be disappointed with the
sharpness,
which is only 40% that of a high quality lens in focus; about one
third what the eye can distinguish. Merklinger recommends
focusing
at infinity— you lose very little forward depth of field. I
feel safe
setting infinity focus opposite the far DOF mark corresponding to 2
stops
larger than the actual f-stop setting (half the number). For example,
if
you are using f/8, it's safe to put the far f/4 DOF mark opposite
infinity.
It's a judgment call. When you make it, think about what parts of the
image
will be dominant. There is no rule to blindly follow.
Film
flatness
Film
doesn't lie perfectly flat— especially roll film (35mm and
medium
format). Sheet film is better. Film flatness is probably the least
predictable
of the factors that degrade image sharpness. According to Robert
Monaghan, "film often buckles in 60% of 35mm SLRs tested, and
virtually
all medium format backs - by an average of 0.2mm (on 35mm). Yet even a
0.08 mm film bulge can reduce contrast by an astonishing 48%!" The
latter
number depends on the f-stop. The equation for the circle of confusion
due to film bulge is (for focus near infinity: s
>> f ),
Cbulge
= bulge/f-stop
For a 0.08 mm bulge at f/5.6, Cbulge
= 0.014mm.
For a 0.2mm bulge at f/5.6, Cbulge
= 0.036mm—
worse than the circle of confusion at the DOF limit. Pretty bad. That's
why we sometimes need to stop down a little more than optimum.
To further confound you, film flatness is a function of time
after winding
the film. And it's different for 35mm and medium
format. According
to Robert
Monaghan,
film gets flatter if you wait up to 30 minutes after winding 35mm film,
but according to both Mohaghan and Zeiss (in Camera
Lens News No. 10) the bulge increases with time after winding
medium
format film: it's small at 5 minutes, significant at 15 minutes and
maximum
after 2 hours. One solid piece of useful information from Zeiss: the
bulge
is only half as much for 220 film as it is for 120. (That means I have
to buy a new back if I go back to using my old Hasselblad; a great
temptation.)
The Zeiss rule of thumb is, " For best sharpness in medium format,
prefer
220 type roll film and run it through the camera rather quickly."
Temperature
and humidity probably also affect flatness.
Oh yes, digital cameras don't suffer from film
flatness problems. That's
one reason why their performance is expected to exceed 35mm with only 6
to 10 megapixel sensors (multiplied by 3 when converted to RGB file
formats).
For much more detail on film flatness, I recommend Robert
Monaghan's exhaustive discussion (with reader comments).
Enter
diffraction
Light
bends when it passes near a boundary. "Near" is defined as a few
wavelengths of light, where the wavelength ω
at the middle
of the visible spectrum— green to yellow-green— is
0.0005 to 0.000555
mm (500 to 555 nanometers). The eye is most sensitive at 0.00055 mm, but 0.0005 may be more
characteristic
of daylight situations. This bending, called diffraction,
is an
unavoidable physical effect that happens regardless of lens quality.
The smaller the aperture— the larger the f-stop ( N
)—
the more the image is degraded by diffraction. The equation for the
Rayleigh
diffraction limit, adapted from R.
N. Clark's scanner detail page, is,
Rayleigh limit
(line pairs per mm) = 1/(1.22 N ω)
The MTF at the Rayleigh limit is about 9%. Most lenses for 35mm and
larger
cameras are aberration-limited— relatively unaffected by
diffraction—
at
N = f/8 and below. The spatial
frequencies for 10% and
50% MTF for diffraction-limited lenses are,
f10
= 0.77/(N ω)
; f50 =
0.38/(N ω)
These numbers are derived from the OTF equation and figure in David Jacobson's Lens Tutorial, Part V (where MTF = |OTF|); see MTF equations, below. The diameter of the corresponding circle, known as the Airy
disk,
is,
CAiry
= 2.44 N ω
(The
1.22 term in the Rayleigh limit comes from the radius.)
Now here's the rub. If it weren't for diffraction, you could stop down
a lens as much as you needed to get the depth of field you desired. But
in the real world you reach a point where diffraction starts degrading
the image more than misfocus. There is an optimum
aperture that
results in the best sharpness over a range of distances. But how to
find
that optimum isn't exactly common knowledge.
You can measure your lens's sharpness and learn how it varies
with aperture using the Imatest
program, which works with a simple target you can print yourself.
To learn more about diffraction, see Sean McHugh's superb Tutorial: Diffraction & Photography.
Use
your depth of field scale to find the optimum aperture
The following procedure lets you determine
the aperture
where you can obtain optimum sharpness over a range of
distances
It is derived in the green box, below.
- Determine the closest and farthest distances you
want to be in sharp
focus.
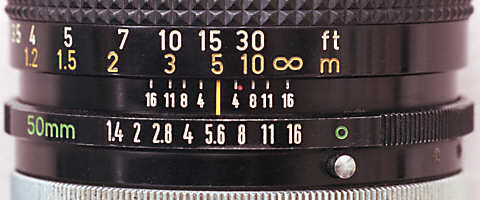
- Focus the lens so identical DOF marks on either side of the
focus mark
are aligned with these distances. For example, if you are using the
50mm
lens in the above illustration and want sharp focus between 14 and 25
feet,
you would place identical DOF marks, in this case, f/4, at these
distances.
Focus would be around 17 feet.
- Make the adjustments indicated in the table below, based on
the f-stop
of the DOF marks at the desired focus limits. These adjustments are
valid
for the 35mm format (C = 0.03 mm)
Aperture
adjustment for optimum sharpness
when
focusing over a range of distances
f-stop
for DOF marks
at
desired focus limits
| Decrease
aperture
by
| Comments
|
| f/4-f/8 |
2
f-stops |
For
example, if marks indicate
f/4,
close
down to f/8. |
| f/11-f/16 |
1
f-stop |
|
| f/22-f/32 |
No
change |
|
| f/45
and above |
Increase
by 1 f-stop (!) |
View
camera territory, where
diffraction
takes
a big bite out of
sharpness. |
| Derivation
of aperture for optimum sharpness over a range of distances |
| The
tables below contain the sharpness (50% MTF
spatial frequency f50 in the
upper table; 20% MTF spatial
frequency f20 in the lower
table) for distances corresponding
to a lens's DOF marks. These numbers are the result of misfocus and
diffraction; they do not include
lens aberrations or film
bulge. There is no general way to include lens aberrations in this
table
because they are dependent on lens design and manufacturing quality.
Aberration
correction is a major factor in distinguishing mediocre from excellent
lenses. The excellent lens
used in this
series has f50 =
61 lp/mm at f/8, which is probably
close to its best performance. The f50
numbers
for exact focus at f/4 through f/8 (upper left in both tables) are
shown
in gray because they are unrealistically high. f50
= 61 lp/mm is nearly as good as a 35mm format lens gets.
Film sharpness, which is
the critical factor in
limiting the sharpness of 35mm images (assuming high quality lenses are
used), and which affects medium format images to a lesser degree, is
also
omitted. For reference, Fuji
Provia 100F,
which is regarded as one of the sharpest and finest grained slide
films,
has f50 = 40
lp/mm, f20
= 70 lp/mm and f10
= 110 lp/mm (the latter two
estimated by extrapolating the manufacturer's MTF plot). This is
comparable
to diffraction at f/16.
The column on the left
indicates the actual f-stop setting. The row on the top indicates the
depth
of field marks on the lens. The cells contain
f50 (upper
table) and f20 (
lower table) at the distances
corresponding to the DOF marks on the top when the lens is set to the
f-stop
on the left.
Example:
Suppose the Canon FD 50mm
f/1.4 lens is focused at 10 feet (3 meters) and set to f/8. The f/4 DOF
marks are opposite 9 and 11.5 feet. At these distances f50
= 47 lp/mm. The f/8 DOF marks are opposite 8 and 14 feet; f50
= 24.4 lp/mm— due almost entirely to the 0.03 mm circle of
confusion;
diffraction is insignificant for this case. The f/16 DOF marks are
opposite
6.5 and 28 feet; f50
= 12.1 lp/mm.
Now, suppose I wanted maximum
sharpness
at the 8 and 14 feet limits, corresponding to the f/8 DOF marks. I
would
set the aperture (actual f-stop) to f/16 (the pale yellow cell in the
table).
f50
at the limits would be 37.8 lp/mm; the in-focus
f50 would
be a maximum of 45.2 lp/mm (not bad). f/11 might give a better
all-around
result— sharper in the center but not quite as sharp ( f50
= 32.6 lp/mm) at the DOF limits— it's an aesthetic judgment
call. Starting
at f/16 diffraction takes a big bite out of sharpness where the image
is
in focus; there is no advantage in stopping down further.
|
f50
(lp/mm) for 35mm format (C = 0.03
mm) at DOF mark
Depth
of field mark
Actual
f-stop |
Diffraction-
limited
f50
in
focus |
4 |
5.6 |
8 |
11 |
16 |
22 |
32 |
45 |
64 |
| 4 |
181
lp/mm |
24.3 |
17.2 |
12.0 |
8.7 |
6.0 |
4.3 |
3.0 |
2.1 |
1.5 |
| 5.6 |
129 |
34.2 |
24.4 |
17.0 |
12.3 |
8.4 |
6.1 |
4.2 |
3.0 |
2.1 |
| 8 |
90.5 |
47.0 |
34.6 |
24.4 |
17.7 |
12.1 |
8.8 |
6.0 |
4.3 |
3.0 |
| 11 |
65.8 |
53.4 |
43.4 |
32.6 |
24.3 |
16.8 |
12.2 |
8.3 |
5.9 |
4.1 |
| 16 |
45.2 |
45.5 |
42.9 |
37.8 |
31.4 |
23.5 |
17.6 |
12.2 |
8.7 |
6.1 |
| 22 |
32.9 |
34.0 |
33.8 |
30.9 |
26.7 |
22.0 |
22.0 |
16.3 |
11.9 |
8.4 |
| 32 |
22.6 |
23.1 |
23.3 |
23.4 |
23.3 |
22.7 |
12.5 |
18.9 |
15.5 |
11.8 |
| 45 |
16.1 |
16.3 |
16.4 |
16.5 |
16.5 |
16.6 |
16.5 |
16.1 |
15.2 |
13.4 |
| 64 |
11.3 |
11.4 |
11.4 |
11.5 |
11.5 |
11.6 |
11.6 |
11.7 |
11.6 |
11.4 |
f50
(lp/mm spatial frequency for 50% MTF)
Includes
misfocus and diffraction,
but
not
lens aberrations.
|
.
|
f20
(lp/mm) for 35mm format (C = 0.03
mm) at DOF mark
Depth
of field mark
Actual
f-stop |
Diffraction-
limited
f20
in
focus |
4 |
5.6 |
8 |
11 |
16 |
22 |
32 |
45 |
64 |
| 4 |
302
lp/mm |
33.7 |
24.0 |
16.7 |
12.1 |
8.3 |
6.0 |
4.1 |
2.9 |
2.1 |
| 5.6 |
216 |
47.7 |
33.9 |
23.6 |
17.1 |
11.7 |
8.5 |
5.8 |
4.1 |
2.9 |
| 8 |
151 |
66.9 |
48.6 |
34.1 |
24.7 |
16.9 |
12.2 |
8.4 |
5.9 |
4.2 |
| 11 |
110 |
80.6 |
63.2 |
46.2 |
34.0 |
23.4 |
17.0 |
11.6 |
8.2 |
5.7 |
| 16 |
75.6 |
74.1 |
67.8 |
57.3 |
46.1 |
33.5 |
24.7 |
17.0 |
12.1 |
8.4 |
| 22 |
55.0 |
56.7 |
55.9 |
53.3 |
48.6 |
40.3 |
32.0 |
23.1 |
16.6 |
11.7 |
| 32 |
37.8 |
38.8 |
39.0 |
39.0 |
38.6 |
37.0 |
34.1 |
28.7 |
22.6 |
16.7 |
| 45 |
26.9 |
27.3 |
27.4 |
27.6 |
27.7 |
27.7 |
27.4 |
26.3 |
24.0 |
20.2 |
| 64 |
18.9 |
19.1 |
19.1 |
19.2 |
19.3 |
19.4 |
19.5 |
19.5 |
19.3 |
18.5 |
f20
(lp/mm spatial frequency for 20% MTF; ~=1/circle diameter)
Includes
misfocus and diffraction,
but
not
lens aberrations.
|
|
|
.DOF
and focal length
It
is well known that short focal length lenses have large apparent depths
of field and long telephoto lenses have small apparent depths of field.
There are some very practical reasons for this conception, but it isn't
quite true. DOF is much more closely related to magnification and
f-stop;
DOF expressed in distance is nearly independent of focal length. It
appears
smaller with telephoto lenses because it is smaller when expressed as a
fraction of the lens-to-subject distance, s.
| Equations
for Total Depth of Field |
Combining
the equations for Df
and Dr from the first box of
equations, we can obtain
the total depth of field.
Total
DOF = Df
+ Dr = sC(s-f
)/( fa-C(s-
f
))
+ sC(s- f )/(
fa+C(s- f
))
= 2 fasC(s- f
)/(( fa)2-C2(s-f
)2)
Now, substitute magnification M
into the equation
using M = d/s = f /
(s-f ); s-f
= f / M.
Total
DOF = 2 fasC(
f
/M )/(( fa)2-C2
f 2
/ M2) = 2asCM /
(M2a2
- C2)
Eliminate s
using s = f
+ f / M = f (1
+ 1/M) = Na (1
+ 1/M), where N = f-stop = f
/ a.
Total
DOF = 2Na2C
(M+1)/
(M2a2
- C2) = 2NC
(M+1)/
(M2 - (CN / f )2)
No approximations yet, but we
haven't entirely eliminated
the focal length f. Fortunately, the (CN
/ f
)2
term is usually much smaller than
M 2, except for very
distant images (with very small magnification). As we point out
below,
c/f
is a constant, independent of format, equal to about 1/1600 for a
"normal"
lens. For example, for the 35mm format with a standard 50 mm lens at
f/8,
cN
/
f
=
0.03*8/50 = 0.0048 ~= 1/200. So the (cN /
f
)2
term can be eliminated from the equation (the error will be less than
1%)
for magnifications M larger than 1/20 (a 20x30
inch or smaller field for 35mm format), which covers most portraits and
still lives.
Total
DOF ~= 2NC (M+1)/
M2
This approximation holds for large
magnifications:
portraits, still lives, etc. (M > 1/20 in the
above example). |
|
Now let's look at Depth of Field for M
~= 1/20 at f/8 for several focal lengths, using Jonathan
Sachs'
Depth
of Field Calculator set for 30 lp/mm resolution (the
default).
DOF
for
f/8, M ~= 1/20, 35mm format
Focal
length
f
mm
| Distance
S
mm
| Near
DOF
limit
mm
| Far
DOF
limit
mm
| Total
DOF
mm
| Total
DOF/S
%
|
| 20 mm |
400 |
319 |
536 |
217 |
54.2 |
| 50
mm |
1000 |
908 |
1113 |
205 |
20.5 |
| 100
mm |
2000 |
1904 |
2107 |
203 |
10.1 |
| 200
mm |
4000 |
3901 |
4104 |
203 |
5.1 |
| 1000
mm |
20000 |
19899 |
20102 |
203 |
1.0 |
For
a specific format,
depth of field, expressed as distance, is independent of focal length.
But depth of field, expressed as a percentage of the distance to the
subject
(Total DOF/s %), is inversely proportional
to focal length.
It can be very small for long telephoto lenses.
Using a long
telephoto lens is an effective
way of isolating a subject from busy, uncontrolled backgrounds without
sacrificing actual depth of field.
DOF
limits, diffraction, and format
We
can draw an interesting conclusion about depth of field for
varous
film formats (35mm up to 8x10
in) by
rearranging the equation for for total depth of field.
| Total DOF = Df
+ Dr = 2 fasC(s-
f )/(( fa)2-C2(s-f
)2)
,
is difficult to interpret,
but we can arrive at
an interesting result if we assume that the subject is relatively
distant
from the lens, i.e., s >> f
. We can then simplify the equation,
i.e., it becomes an approximation.
Total
DOF(s>>f )
~=
2 faCs2/(( fa)2-(sC)2)
= 2 as2(
f/C)/(( f/C)2a2
- s2) |
| The
circle of confusion C
at the
DOF limit is based on the 0.01 inch = 0.25 mm feature in an 8x10
inch print. On the film, C (mm)
= 0.25/(magnification for
an 8x10 print).
For a constant angle
of view, lens focal length f
is proportional
to the format size (cropped for an 8x10
inch image) and inversely proportional to the magnification.
f/C
is therefore a constant, independent of the format, about 1600 for a
"normal"
lens. The following table shows approximate values of key parameters
for
various formats. |
| Format |
f
(mm)
"normal"
lens
| Magnification
8x10
print
| C
(mm) |
| 35mm
(24x36 mm) |
50 |
8x |
0.032 |
| 6x6
cm |
80 |
5x |
0.055 |
| 6x7
cm |
100 |
4x |
0.064 |
| 4x5
in |
200 |
2x |
0.128 |
| 5x7
in |
250 |
1.6x |
0.16 |
| 8x10
in |
400 |
1x |
0.25 |
|
|
Since
f/C
is a constant, independent
of format, depth of field is constant for constant aperture opening a.
And since f-stop N = f
/a,
Depth
of field is constant when the f-stop is proportional to the format
size,
i.e., DOF is the same for a 35mm image taken at f/11, a 6x7 image at
f/22,
a 4x5 image at f/45 or an 8x10 image at f/90.
This has important consequences when the lens sharpness becomes
diffraction
limited— beyond around f/11 for 35mm; slightly larger for
large formats.
(High quality lenses become diffraction-limited at larger
apertures.
The f-stop at which diffraction becomes dominant increases rather
slowly
with format size.)
A lens is likely
to be diffraction-limited
when a large depth of field is required; the larger the
format, the
more it must be stopped down; hence the more likely it is to be
diffraction-limited.
Once a lens is diffraction-limited its resolution is inversely
proportional to its f-stop. This leads to a rather surprising
observation.
When
a lens is stopped down so to achieve a large depth of field, and is
diffraction-limited,
increasing the format size does not increase image sharpness, i.e.,
total
resolution. For example, an 8x10 image taken at f/64 will be no sharper
than a 4x5 image taken at f/32.
This statement applies primarily to large formats (4x5
and above). For small formats, particularly 35mm, image sharpness is
limited
by film resolution. Fuji
Provia 100F,
one of the finest grained slide films, has resolution roughly
equivalent
to diffraction at f/16 ( f50
= 40 lp/mm; f20
= 70 lp/mm), but since the total system MTF is the product of the MTF
of
the individual components, you can see some improvement in overall
sharpness
for lens apertures as wide as f/8. You must choose
film
with care for optimum sharpness in the 35mm format. Film resolution
also
limits the sharpness of medium format images, but this is only
noticeable
on images larger than 13x19
inches—
the maximum for inexpensive consumer printers.
When large depth of field is needed, lenses usually have to be
stopped
down beyond their optimum aperture, especially for large formats, where
very small apertures are required. Diffraction in digital
cameras
is discussed here.
Sweet
spot and format
The
large format images you've seen that were thrillingly sharp—
the images
that tempted or inspired you to schlep a view
camera— were taken
at f-stops near the lens's optimum
aperture,
between large apertures where it is aberration-limited and small
apertures
(with large depth of field) where it is diffraction-limited. Optimum
aperture
is typically around 2 to 4 f-stops below maximum aperture; in the
neighborhood
of f/11 for medium format, f/16 for 4x5,
and f/32 for 8x10.
Many of these ultra-sharp
images are distant landscapes that don't require large DOF.
If large DOF was required, it was obtained by using the
camera's movements,
particularly the tilt, which allows the plane of focus to be altered
(via
the Scheimpflug
effect). Virtually all large format cameras have these movements; they
are a major advantage. (Another, lesser, advantage is that sheet film
tends
have better flatness
than roll films.) Few
medium format cameras have these movements. (The Rollei
SL66 was a rare and wonderful exception.) A few 35mm camera
systems
(most notably Canon) offer specialized lenses with movements. I love my
old Canon FD 35mm f/2.8 TS lens, despite its manual aperture.
There is a sweet spot
between
large apertures, where lenses are aberration-limited, and small
apertures,
where they are diffraction-limited. Let's take a closer (but rough,
qualitative)
look. Good 35mm lenses tend to be sharpest around f/8,
aberration-limited
starting around f/5.6, and diffraction-limited starting around f/11.
The
total detail a lens can resolve at large apertures, where performance
is
aberration-limited, is relatively independent of format. It is a
function
of lens quality and design. A good lens can resolve about the same
detail
at f/5.6 for 35mm as for 4x5,
where
the image is much larger, but 4x5
images
will have more detail because 35mm images are limited by film
resolution.
The total detail a lens can resolve at small
apertures, where performance
is diffraction-limited, is proportional to to the format size and inversely
proportional to the f-stop. A 35mm lens at f/11 resolves about the same
total detail as a medium format (6x7)
lens at f/22, a 4x5
lens at f/45, or
an 8x10 lens at
f/90. Resolutions at
these apertures are roughly comparable to resolution of a high quality
lens at f/5.6. (Disclaimer: this estimate is very
rough! Variations between lenses make
a huge difference.)
The sweet spot— the range of apertures
with excellent sharpness, tends
to be between f/5.6 and the aperture corresponding f/11 for the 35mm
format
(f/22 for medium format, f/45 for 4x5,
and f/90 for 8x10).
It comprises about
3 f-stops for 35mm, 5 f-stops for medium format, 7 f-stops for 4x5, and
9 f-stops for 8x10.
The
larger the format, the larger the sweet spot.
Lenses have their optimum
aperture—
their highest total resolution— near the center of the sweet
spot, typically
around f/8 for 35mm, f/11 for medium format, f/16 for 4x5,
and f/22 for 8x10.
In practice, f/16
may be more practical for 4x5
and f/32
is more practical for 8x10
because
depth of field is severely limited for large formats. Testing and
experience
will teach you which apertures are sharpest for your individual lens,
but
these numbers are good estimates. Optimum aperture is not sharply
defined:
for example, a good 4x5
lens with an
optimum aperture around f/16 should produce excellent image quality
between
f/11 and f/32. Since large format
lenses tend to
be diffraction-limited at optimum aperture,
Total
resolution at optimum aperture scales roughly with the square root of
the
format size for large formats.
This rough but useful approximation applies to lenses only. When film
losses
dominate image quality, as it does for 35mm and medium format (recall,
Fuji
Provia 100F has MTF comparable to diffraction at f/16), total
resolution
scales linearly with format size. There is a greater advantage to
larger
formats.
I need to stress that the advantage of large formats is
greatest when
lenses are not stopped down to achieve extreme depth of field.
For very small formats— for compact
digital cameras with 11mm diagonal
or smaller sensors (1/4 the size of 35mm), the sweet spot is extremely
small. Lenses are aberration and
diffraction-limited at the same
aperture, around f/4 to f/5.6. They are severely diffraction-limited at
f/8, where DOF is equivalent to f/32 or more in 35mm. (They rarely go
beyond
f/8.) But even though lens resolution is less than for 35mm film
cameras,
tiny digital cameras still produce very sharp images at f/4 and f/5.6
because
their tiny pixels— 4 micron spacing or less with no
anti-aliasing filters—
have far better lp/mm resolution than 35mm film. Image resolution is
almost
entirely dominated by the lens.
Detail can be quite stunning in well-made large
format images, particularly
in very large prints— beyond the 13x19
inch maximum size of most consumer digital printers. Large formats have
little advantage for 8½x11
inch
prints, although traditional 8x10
contact
prints have a unique tonal beauty, particularly when made on special
contact
papers such as Azo.
I've recently seen some incredibly sharp huge prints (over 40x50
inches) made from 8x10—
sharper than
you could achieve with 4x5.
But 4x5
is the largest practical format for carrying on hikes, and it has its
own
"sweet spot" for inexpensive flatbed film scanners such as the Epson
2450 and 3200. Even though these scanners have somewhat
poorer resolution
than dedicated film scanners, their resolution is sufficient to make
sharp
32x40 inch
prints from 4x5
film (the same magnification as 8x10
prints from 35mm). Of course I'd need a wide body printer, like the 24
inch wide Epson 7600,
which could make extremely sharp 24x30
inch prints from 2450/3200 scans. Tempting!
Links
Jonathan Sachs' Depth of Field
Calculator DoF 4.0— An advanced graphical
depth of field calculator for Windows and Android from the creator of my favorite
image editor.
David
Jacobson's Lens
Tutorial— An excellent introduction to
optics, with a moderate
number of equations.
Bob Atkins' pages on Technical
Optics— The Depth of Field Calculator
contains a nice applet.
Nicholas V. Sushkin's Online
Depth of Field Plotter— Contains some of
the equations I use
and another DOF calculation applet.
Harold M. Merklinger's Depth
of Field Revisited— An excellent
explanation of why using hyperfocal
distance results in underwhelming sharpness in distant parts of
landscape.
Also visit his index
and list of PDF
articles.
Andrzej Wrotniak's Photo Tidbits: Depth
of Field and your Digital Camera— A nice
introduction, which
includes DOF tables for digital cameras.
.
| MTF
equations for circle of confusion and diffraction. |
The
equations below are from David
Jacobson's Lens Tutorial. MTF is the
absolute value of the optical
transfer function OTF (MTF = |OTF|),
which includes
phase and hence can go negative. The OTF for the circle of confusion C
is based on a mathematical function called a
Bessel function of the first
kind (J1), which you won't find in simple
programming
languages, but which can be adequately approximated using
2 J1(x)/x ~= sinc(0.84x) where sinc(x)
= sin(x)/x;
below the first null of sin(x); x < π.
Let s
= λ N fsp ; a
= π C fsp
where λ = wavelength of light
(typically 0.0005 or 0.000555 mm for green or yellow-green, near the
middle
of the visible spectrum; N =
f-stop; fsp
= spatial
frequency; π = 3.14159; C
=
Circle of confusion. s
and a are dimensionless.
For pure diffraction (no focus
error; a=
C
= 0),
OTF(s)
= 2/π (arccos(s) -
s sqrt(1-s2
))
for s < 1
= 0 for s
>= 1
For focus error only with circle of
confusion C (no
diffraction; s = 0),
OTF(a)
= 2 J1(a)/a
;
J1 is a first order Bessel function.
~= sin(0.84a)/(0.84a)
up to the first
null (0.84a < π)
For combined diffraction and focus
error,
Because of phase effects implicit in OTF,
the combined diffraction and focus error is not
the product
of the OTF's for diffraction and misfocus. (You can
multiply MTF's
for separate components, e.g., lens and flim, because phase is lost
when
you go from one to another.) The combined equation is relatively easy
to
solve numerically. It appears to work well in the limits of a
>>
c
(diffraction dominant) and a << c
(misfocus dominant).
Here is a plot of the individual and combined terms for N
= f-stop
= 22, C = 0.03mm and lambda (wavelength of light) =
0.000555mm (the
same data as
David
Jacobson's plot). The pale green dotted line is the sin(0.84x)/(0.84x)
approximation
to the Bessel function for C, which works up to the
first null.
 Using the OTF/MTF
equations we can
find the spatial frequencies where MTF from
misfocus and diffraction
is 50%, 20% and 10% ( f50 ,
f20 and
f10
).
These frequencies are shown in the graph below. Using the OTF/MTF
equations we can
find the spatial frequencies where MTF from
misfocus and diffraction
is 50%, 20% and 10% ( f50 ,
f20 and
f10
).
These frequencies are shown in the graph below.
 The solid curves are f10
(upper), f20
(middle) and f50
(lower), derived from the OTF equation for combined
diffraction
and focus error. The peaks in f10
and f20
are due to idiosyncracies of the combined OTF
equation. The dotted
lines are analytic approximations— much easier to work with,
and I suspect
more trustworthy. The approximations for f50,
f20
and f10 as
functions of f-stop
N and circle
of confusion C are, The solid curves are f10
(upper), f20
(middle) and f50
(lower), derived from the OTF equation for combined
diffraction
and focus error. The peaks in f10
and f20
are due to idiosyncracies of the combined OTF
equation. The dotted
lines are analytic approximations— much easier to work with,
and I suspect
more trustworthy. The approximations for f50,
f20
and f10 as
functions of f-stop
N and circle
of confusion C are,
f10
= c10 / sqrt(d102
- .5 d10 + 1)
; c10 =
1.10/C ; d10
= 1.27 λN c10
f20
= c20 / sqrt(d202
- .7 d20 + 1)
; c20 =
0.99/C ; d20
= 1.49 λN c20
f50
= c50 / sqrt(d502
- .7 d50 + 1)
; c50 =
0.71/C ; d50
= 2.49 λN c50
If we neglect diffraction (let λN
approach zero), we can use the simple approximations,
f50
= 0.72/C
; f20
= 1/C ;
f10 = 1.11/C
|
|

|
Images
and text copyright © 2000-2013 by Norman Koren. Norman Koren lives
in Boulder, Colorado, where he worked in developing magnetic recording
technology for high capacity data storage systems until 2001. Since 2003 most of his time has been devoted to the development of Imatest. He has been involved with photography since 1964. |
 |
