Building
simple content-intensive web pages
Part
2: Using Composer
by
Norman
Koren
This
tutorial teaches you to create attractive web pages with lots of text and
images, without resorting to advanced techniques, like CSS or PHP, which
involve a big learning curve.
updated
Jan. 31, 2004
Table
of contents: Part 1: Introduction
| Part 2: Using Composer
| Preferences | Control
bars | Formatting |.Tables
| Images | Links
| Minimizing SPAM | Misc.
| Glitches | Conclusion
Notice of obsolescence (Sept. 2005)
I no longer use Netscape composer. I now use Nvu, which is a superb free web authoring tool, with a number of nice features, such as four different views and CSS support. It evolved from Mozilla Composer, a part of Mozilla 1.x.
|
Part 1 introduced the elements of building
web pages. This part focuses on using the WYSIWYG editor, Composer.
Using
Composer
Now we get to the heart of the matter: using Composer to write web pages.
When you open Composer, you get an empty version of the window shown below.
You can start typing right away-- it's that simple. Composer behaves like
a basic word processor. Or you can open a file by clicking Open,
then navigating to the file name. We illustrate a portion of a draft of
the previous page below.
 What you see is pretty close to what you get. Composer is WYSI-almost-SYG.
The solid and dashed lines are the outlines of an invisible table (Border
line width = 0). The funny yellow
What you see is pretty close to what you get. Composer is WYSI-almost-SYG.
The solid and dashed lines are the outlines of an invisible table (Border
line width = 0). The funny yellow symbols contain raw HTML code Composer doesn't recognize. I copied this
code from Google to produce the search box. You can double-click on the
symbols to edit the code.
symbols contain raw HTML code Composer doesn't recognize. I copied this
code from Google to produce the search box. You can double-click on the
symbols to edit the code.
Right-clicking on any object: selected text, image, table, or link,
brings up a dialog box with options for editing it. You should get to know
the options.
Help..
You can learn quite a bit about Composer by clicking Help,
Help
Contents, Creating web pages
(on the left of the Help window), Starting
from a New Page (on the right). That puts you at the beginning of
Netscape's Composer tutorial. Expand the window to make it more readable.
You'll want to refer to it occasionally. Netscape Composer tutorials worth
checking out: Pat
Pecoy (version 4; a few differences) | RIT
(4.x) | California
State University, Long Beach (4) | Trinity
University. You'll find more on Google, of course. Finally, a
nice set of links on Composer.
Preferences.
| Before you go further, you may want to set the Composer defaults.
Click on Edit, Preferences...
The box on the right appears. Click on Composer
to bring up the settings on the right. Choose appropriate locations
for your HTML editor (1st Page 2000, in this case) and image editor (Picture
Window Pro, which you have encountered if you've been to my photography
pages). These are .exe files, usually located in subdirectories of C:\Program
Files.
Click on Publishing, under Composer.
My preferred settings are:
Maintain links: checked
Keep images with page: unchecked
Default publishing location:
blank (ignore). I've had trouble getting this to work. It does the same
thing as the FTP program, but it's much
less flexible. For example, you can't look at or alter the directory on
the web host. That makes it pretty useless.
|
|
 |
Control
bars

The top of the Composer window consists of a title bar and three rows
of commands.
-
The page title, the file name, and "Netscape Composer"
-
The pull-down menus. File Edit
View Insert Format Tools Communicator Help. All commands
can be found here. Commands on the third and fourth lines are shortcuts
to commands in the pull-down menus.
-
Simple commands. Several-- New, Open, Save,
Cut, Copy, Paste, Print, and Find--
are standard Windows commands from the File
and Edit pull-down menus. The remainder
are from the Insert and Tools
menus.
Operations for formatting text and paragraphs. All are shortcuts to
Format
menu commands
Page properties
Click Format, Page
Colors and Properties, or right-click on any text outside a table
or link and click on Page Properties.
The following dialog box appears, shown here with General
and Colors and Background tabs. The
META
Tags tab is rarely useful.
General tab: Enter a good Title
(generally less than 10 words) and Description
(generally 25 words or less). The title goes into the bookmark when someone
bookmarks your page; both are used by search engines for indexing the page--
they're
very important! Your name should be in Author.
Keywords
(a Meta tag) should contain keywords relevant to the page, including words
that may not appear in the page itself (or might appear in an image, which
search engines can't see). They were used by older search engines for indexing
the page. I don't think Google makes much use of them, but I'd still include
them. Don't try to cheat by repeating the same keyword dozens of times
to boost search engine placement. Modern search engines might throw you
out entirely.
Formatting
Most text and paragraph formatting can be done with icons on the bottom
bar.

-
Paragraph style. Most text is Normal.
Heading 1 through Heading 6 should be used for headers. Heading text is
boldface
and separated from Normal text by line spaces above and below. 1 is largest;
4 is normal text size; 6 is smallest. I use Heading
3, Arial, dark red, italicised
for headers in this document. I don't use the other styles (Address,
Formatted,
etc.) much.
-
Font. To maintain compatibility with a wide range of computers,
I stick with Variable width (the default; same as Times New Roman), Fixed
width (same as Courier New), Arial,
and Comic Sans MS. Others display properly
only on computer systems where they're installed. You have no guarantee
what they'll look like.
-
Font Size. Use relative sizes: -2 (smallest; looks
like this) through +4 (largest). +2 looks like this.
0 is the default. Heading n gives you Font size 4-n (couldn't
resist a little equation).
-
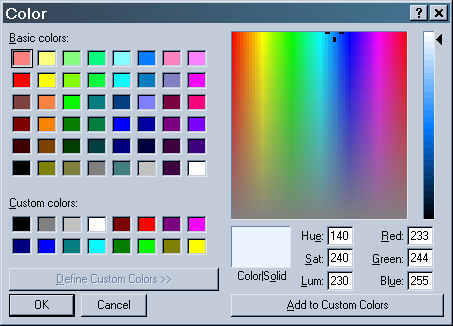
Font Color. Opens a window with 49 basic
colorsto
choose from. Clicking
Other... opens
a box with the full spectrum of colors. Unfortunately it doesn't show the
current color correctly.
-
Bold. Toggles-- turns bold on/off.
-
Italics. Toggles,
-
Underline. Toggles. Bold, Italics and Underline
may be combined.
-
Remove all styles. Normal text. Removes the previous three, and
any others like subscript or superscript.
-
Bullet list. One bulleted item per paragraph. Toggles. Tip:
There is no space between items in a bulleted list, which can make lists
look crowded, especially with long paragraphs. To get a single line space,
enter Insert, New
Line Break (or type shift-enter) before ending the paragraph (by
typing enter). [Alternate approach: enter two lines (two bullets
appear). Positon the cursor after the first bullet. Click on the Bullet
list icon (9) to toggle the bullet off. Press Backspace. Exactly the right
space remains. This method is more reliable than shift-enter.]
-
Numbered list. This is a numbered list. There is one numbered item
per paragraph. Numbers appear as # in Composer, but display correctly in
the browser. Toggles. Tip:
There is no space between items in a numbered list, which can make lists
look crowded, especially with long paragraphs. To get a single line space
without breaking the number sequence, enter Insert,
New
Line Break (or type shift-enter) before ending the paragraph (by
typing enter). It's done here as an example. Sometimes the space capriciously
disappears. You may have to reenter it save the file to see it again.
.
-
Decrease indent of paragraph one level.
-
Increase indent of paragraph one level. Whenever the indent level
changes there is a space between lines. Indents are valuable for quotations.
-
Alignment. Applies to entire paragraph. A window drops down to let
you choose left, middle, or right. Useful with images as well as text.
Other formatting features
Selectng text and clicking Format,
Style
can get you strikethrough,
superscript, subscript,
,
and nonbreaking (doesn't get split into two lines; useful
with equations like E = mc2, duh).
Clicking Tools, Character
Tools can get you Insert Special Character..., Rainbow
Colorize
(You need a long line to see the rainbow effect; I don't find it very useful),
and SMALL CAPS.
Special characters (for example, € for Euro) are shown on the right.
They're limited. Mu is the only Greek character. Pi would have been nice. |
 |
You now have a pretty good arsenal of character and paragraph formatting
tools. But to format pages, you need Tables.
Tables
Tables are important for building pages with good layout. You can use them
as ordinary tables (illustrated below), but you can use them in a more
powerful and subtle way: to format pages. The secret is simple: Tables
can easily be made invisible by setting Border line width to 0, and tables
can be nested within tables. When you get comfortable with
them, Tables give you incredible power to format pages any way you like.
Click Table (or
Insert,
Table),
and the New Table Properties dialog
box on the right is shown. I've left the default values, which I rarely
keep because they look pretty clunky. A 3x3
(rows x columns) table with default
Border, spacing and padding of 1, filled with miscellaneous text, is shown
below.
| Header 1 |
Header 1 |
Header 3 |
| Cell with
color |
Cell
with another color |
|
| Column 1 |
Column 2 |
Row 3, Column 2 |
Choose the number of rows and columns in the table. Don't fuss over
the settings: you can easily edit them later. Table
Alignment applies to tables under 100% width. If you check Include
caption, a caption will appear above or below the table. An empty
caption can be used for spacing.
I always leave Border line width
checked. I set it to 0 for an invisible table or 1 for a table with visible
cells. Larger values look clunky. I usually set Cell
spacing to to 0 if Border line width
is nonzero. I sometimes set it larger in invisible tables (Border
line width = 0)-- it makes a difference in appearance when cells
are colored. Cell padding is the spacing
between the cell boundary and the text. It often has the same effect as
Cell
spacing. I set it at 0 when I want a table to fit in with regular
text. (This very text is inside a 1x2
table with Cell padding = 0.) I set
it between 2 and 6 when I want some spacing.
Table width (pixels or % or window)
sets the table width. If you uncheck it, it will be as large as necessary
to fit data (up to 100%). Table min. height
doesn't seem to work. I set Equal column widths
as needed. |
 |
.
 Use
Color lets you pick a background color with the same choices
as Page Properties
and Font. Use
image allows you to use a image as the background color. This image
is tiled: stacked horizontally and vertically. It is typically a small
JPEG or GIF file, 100x100 pixels or
so, but it can be larger. It should contrast with the text. A dark background,
suitable for light text, is shown on the right. To get an image, you typically
click on Choose Image... then navigate
to the image. This checks the Use image
box. Use
Color lets you pick a background color with the same choices
as Page Properties
and Font. Use
image allows you to use a image as the background color. This image
is tiled: stacked horizontally and vertically. It is typically a small
JPEG or GIF file, 100x100 pixels or
so, but it can be larger. It should contrast with the text. A dark background,
suitable for light text, is shown on the right. To get an image, you typically
click on Choose Image... then navigate
to the image. This checks the Use image
box.
Click OK to create the table.
Tables (and Rows and Cells) are easy to edit. Just right-click on the
table (selecting the appropriate row or column, if needs be), then select
Table
Properties to open the Table Properties
dialog box, shown on the right. You can select from one of three tabs:
Table,
Row,
or Cell. The most recently used of
the three appears. The Table tab is
identical to the New Table Properties
dialog box. The Row tab is similar
to the Cell tab, shown on the right,
except that the middle entries, Cell spansthrough
Cell
min. height, are omitted.
Most of the settings are pretty obvious, but there is hidden power here.
You can set cell height as you please in units of % of table or pixels,
then put a color or image in Cell Background
to make neat borders. Header style
is centered and bold.
Cell spans is tricky. You can use
it to make an individual cell span more than one row or column. But it
doesn't simply consolidate cells, as you might expect. It extends the selected
cell and moves the remaining cells. I couldn't get the hang of this feature
until I realized that I needed to delete excess cells at the end of the
row or column I just extended. You do this by right-clicking on the excess
cell, then clicking Delete,
Cell.
The table below is an example of a 3x3
table where Row 1, Column 2 has been extended to cover two columns, and
Row 2, Column 1 has been extended to cover two rows. |
 |
.
| R1, C1 |
R1, C2 |
| R2, C1 |
R2, C2 |
R2, C3 |
| R3, C2 |
R3, C3 |
You may have to play with tables a while to get comfortable, but once
you get the hang of them you can do some amazing formatting. Remember,
you can put tables in cells of tables, giving you endless possibilities.
One more example: the banner I use to link to my major pages. It consists
of a table within a table. Here is what it looks like in composer:
 The outer table has just one row and one column. Key properties: Table
alignment = center, Border line width
= 0, Cell spacing = 0, Cell
padding = 2, Cell background: Use color:
Other..., R,G,B = (232,232,232) (hexidecimal #E8E8E8). Table
width is unchecked; the displayed width fits the data. The inner
table has one row and five columns. Key properties: Table
alignment = center, Border line width
= 0, Cell spacing = 2, Cell
padding = 0, Table width = 100%.
Columns 2 and 4 are empty-- they are used for spacing. Key property: Cell
width = 10 pixels.
The outer table has just one row and one column. Key properties: Table
alignment = center, Border line width
= 0, Cell spacing = 0, Cell
padding = 2, Cell background: Use color:
Other..., R,G,B = (232,232,232) (hexidecimal #E8E8E8). Table
width is unchecked; the displayed width fits the data. The inner
table has one row and five columns. Key properties: Table
alignment = center, Border line width
= 0, Cell spacing = 2, Cell
padding = 0, Table width = 100%.
Columns 2 and 4 are empty-- they are used for spacing. Key property: Cell
width = 10 pixels.
Now we turn to images.
Images
You'll almost certainly want to add images to your pages. Web images are
kept in separate files, which should be one of the following types.
-
JPEG (.jpg) A compressed image suitable
for full-toned photographic images. Uses lossy compression. The degree
of compression depends on the amount of detail in the original image and
the quality level (usually expressed in percentage) you select when you
save it. The greater the detail, the less the compression. Wavy artifacts
are apparent near boundaries at all but the highest quality levels; they
worsen at low quality levels. Setting the quality level involves a tradeoff.
If it's too high, the image looks excellent but is large and may load slowly.
If it's too low, image quality suffers. Ttrial-and-error will teach you
the appropriate quality level. 70-90% is suitable for most web images;
higher is appropriate where extreme quality is required. JPEG artifacts
disappear above about 97%. Where possible, avoid making a JPEG of a JPEG
(unless quality levels are high)-- it can look pretty ratty. You should
always save original artwork in an uncompressed file format, preferably
TIFF
(.tif) or PNG (.png). JPEG doesn't
support B&W images-- they are saved as color images with R=G=B in each
pixel.
-
GIF (.gif) A compressed image format
suitable for block graphics and images with limited color palettes. Not
suited for full-toned photographic images. If there are too many colors
in the image, splotchy dithering artifacts may appear in smooth areas.
There are no wavy JPEG-type artifacts. Most of the dialog boxes on this
page are GIFs. One color of a GIF image can be made transparent--
the background color will be displayed in its place.
-
PNG (.png) A new
standard developed to get around a patent
on GIF files (held by one of my former employers, no less). Exceptionally
versatile, but not yet as widely used as the JPEG or GIF. Employs lossless
compression; doesn't have the palette limitations of GIF. Supported by
most
browsers for several years. Can be used for saving original artwork;
could replace TIFF in many applications. Less compression on full-toned
color photographic images than JPEG, but it sometimes beats JPEG for B&W.
There is a nice summary table in Scantips.com.
Images should be properly sized, measured in pixel dimensions (you can
ignore the size in inches and resolution in pixels per inch). Most monitors
display at least 800x600 pixels, but
virtually everybody interested in photography has a monitor that displays
at least 1024x768 pixels. That's what
I assume in writing my pages. The largest images I use for displaying fine
photographs are 800 pixels horizontally and 640 vertically, maximum. Some
people are afraid to go that large; they're afraid their pictures might
be stolen-- that they could be upsampled with a program called Genuine
Fractals and printed large. They needn't worry. Genuine Fractals is
somewhat overrated. An
800x600 pixel image makes a mediocre
4x6 inch print (about 140 pixels per
inch) and a poor 8x10. I don't worry
about people using my images as screen backgrounds. They might like them
enough to buy one some day. I'm more concerned about the time it takes
to load large images.
I display most images smaller than 800 pixels wide or 640 high. Images
that are larger than necessary should be resized down. For example, if
your 4 megapixel digital camera makes 2272x1704
pixel images (a 4:3 ratio), you might want to resize them to 600x450
pixels for web display. Remember to crop out unnecessary portions. It's
usually a good idea to sharpen after resizing.
An outstanding free program called IrfanView
has most of the features needed for manipulating images for web page display:
crop, resize, sharpen, rotate, flip, etc. It can save an image in almost
any format. It functions as a rudimentary image editor: Enhance
colors allows you to adjust brightness, contrast, gamma, R, G, and
B. Absolutely worth downloading.
But it's not a full-featured image editor. For that I use Picture
Window Pro.
You may occasionally want to use an image from your computer screen
for your page. To copy a window to the clipboard, select the window, size
it appropriately, and click Control-Print
Screen. To copy the entire screen, click Print
Screen. To copy the image into an image editor, click Paste
(usually in the Edit pull-down menu).
You can edit it (typically crop and/or reduce it) and save it in an appropriate
format (JPEG for photographic images; GIF for block graphics or images
with limited color palettes).
| Inserting an image.
Click on Image or Insert,
Image...
to bring up the Image Properties dialog
box shown on the right. Select an image by entering it in the box or clicking
Choose
File and navigating. Images don't have to be on you site; they can
be on remote sites as well. You should observe copyrights. Remember that
images on remote sites can be deleted without your knowledge.
Text alignment and wrapping around images
determines image placement. The two settings on the right wrap the text
to the right or the left of the image. I frequently use them with images
less than about 480 pixels wide. I often use tables to format images and
text-- the results are more predictable.
I leave Dimensions alone when inserting
an image. The correct pixel sizes appear later, when you edit the image.
Space
around image is important. Most images need breathing room. I almost
always enter numbers into Left and right
and Top and bottom. I use Solid
border occasionally for images that need it-- rarely more than one
pixel. Glitch: if you make the image into a link, which is a nice way of
displaying a large image (in its own page) by clicking on a thumbnail,
Composer will add a 2 pixel
Solid border.
I usually reset it to 0 manually.
Alt. Text allows you to enter text
that appears when you move the cursor over the image. It was originally
intended to replace images in non-graphic browsers. Does anybody still
use them? Since alternate text is picked up by search engines like Google,
it's a good idea to enter a clear description with important keywords. |
 |
|
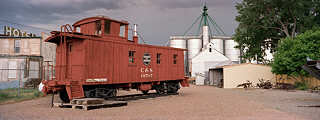
Click OK to load the image. The
selected image, a 320 pixel wide thumbnail of the Chugwater, Wyoming caboose,
appears below Image Properties.
You can bring up Image Properties
for editing by right-clicking on an image and selecting Image
Properties.
One glitch: If you change
the size of an image, Composer usually refuses to recognize it because
the original image is stored in the cache
(an area of memory where recently accessed images are stored to save time).
To fix this, click
Save,
Preview
(or go to the browser). In the browser window, right-click on the image,
then click on View image. Click Reload.
Click Back to return to the page. The
revised image should appear (click Reload
if it doesn't), but it will be sized incorrectly. Now go back to Composer
and click View, Reload.
The revised image should appear, still sized incorrectly. Right-click on
it, then click on Original Size. The
Dimensions
should change. Click OK. This doesn't
always stick! Right-click on the image again to see if the size is correct
(if it is, clicking Original Size won't
change it). To make it stick, manually enter the numbers brought up by
clicking
Original Size-- just retype
what's there. I know it doesn't make sense, but it works. I've done this
annoying procedure enough times to run through it in 30 seconds flat. Whew!
Links
Links, properly known as hypertext links,
make the World Wide Web go 'round. They're like footnotes that you point
to with a magic wand (your mouse), and voila! the article magically
appears. No more rummaging in library stacks. (It could be fun, and you
often chanced on weird and wonderful stuff, but the same thing can happen
on the web.)
.
You can link to
-
external web pages. You should first bring the page up in a browser
(any browser), then copy (control-C) the URL into the clipboard. The complete
URL, including https://, must
be present.
-
pages on your site. The URL is relative
to the current page.
-
named targets in the file you are editing
or in external pages. A named target
is a location inside a page that can be linked to. You create one by clicking
on Target or Insert,
Target...,
entering a unique name, clicking OK,
then saving the file. The target symbol
 appears. You can edit a target later. Named targets are particularly useful
for creating tables of contents.
appears. You can edit a target later. Named targets are particularly useful
for creating tables of contents.
-
mailto: For opening the e-mail client. Format: mailto:name@domain.com.
When you click on a mailto: link, your browser opens a new e-mail message
addressed to name@domain.com. To avoid
SPAM,
implement the tricks below.
|
 |
To create a link, select
the text to be made into a link and click on Link,
or click on Insert,
Link...,
or right-click on the text and select Create
Link using Selected... The latter is my favorite, by habit. The
dialog box on the right appears. The Link
to a page... box is initially blank.
-
For an external web page, paste (control-V) the URL you just copied
into the box. For a named target within an external page, you'll have to
copy the link name from a table of contents or find it by another means
and append it manually to the URL. It starts with a pound sign immediately
following the URL, e.g., https://www.normankoren.com/makingfineprints.html#Whyscan.
-
For pages on your site, click on Choose
File... and navigate. Once the file is selected, a list of named
targets appears. Select one if you wish to link to it.
-
For a named target within the file you are editing, select one from
the list.
-
For a mailto: link, enter mailto: immediately followed by the e-mail
address, in the format indicated above.
When the link is ready, click OK. This
process can be very fast. With practice you can create a link in
well under 10 seconds.
How
to minimize SPAM: Never put your e-mail address in
text format
anywhere on your site or use mailto: with your text
format address. Try one of these techniques.
-
Use a small
image of your e-mail address in GIF or PNG format. People won't be able
to copy and paste it-- a small inconvenience. More importantly, evil SPAM
sipders won't find it. Of course if someone else puts your e-mail address
on their site you're out of luck.
-
Go to https://hsltd.us/links/spamblock.html
and implement their technique that replaces regular characters with ASCII-coded
characters that SPAM spiders don't yet recoginze. For example, earthlink
becomes %65%61%72%74%68%6c%69%6e%6b, etc. Mailto: should remain fully functional,
but it's anybody's guess how long it will take the evil spiders to figure
it out. You'll need an HTML editor like 1st
Page 2000 to paste the text. On my contact
page I've combined this technique with an
image.
-
If you e-mail
me, I'll send you a Javascript that's as close to foolproof as anything
I've seen. But I can't be certain spammers won't find a way around it.
Because of that concern, the friend who developed it preferred that I don't
put it on a public page. If the smappers figure it out, you'll need to
use forms (a more advanced technique) or stick with a simple image file
that has to be copied manually. Or make sure your ISP has an excellent
SPAM filter.
-
Put your
e-mail on a single contact page. That way you can easily update it if you
need to.
For more
detail, look at Why
Am I Getting All This Spam?
Miscellaneous
-
H Line inserts a horizontal line. You
can edit its properties (length, line width, etc.) by right-clicking on
it and selecting Horizontal Line Properties.
-
Spelling runs a spell checker. Handy.
-
Edit, HTML
source opens the file in the editor you specified in Preferences.
When you return to Composer after having altered the file, it asks you
if you want to load the modified version.
-
View, Reload
reloads the image. It often changes the file slightly. See glitches, below.
View,
Refresh
refreshes the images-- cleans up junk that sometimes creeps into the screen
for no good reason.
-
Insert, HTML
Tab... allows you to enter HTML code Composer doesn't normally recognize,
like Java Scripts. The
symbol appears. You can double-click on it to edit it. Very useful for
adding comments-- text which starts with <!-- and ends with -->. Comments
aren't displayed by the browser, but they help you remember what you were
thinking while you were writing.
Glitches
The main annoyance is that Composer removes blank lines in certain places
(worst inside or next to tables) and sequences of spaces (more than one;
worst where fonts change) when a file is loaded. Blank lines between tables
vanish entirely so that tables end up abutting each other. To see how loading
the file changes its appearance, click Save,
then click View, Reload.
Sometimes I use captions to space tables. But most of the time I use periods,
colored the same, or similar to, the page background. Works like a charm.
Line spaces between tables and text are not always displayed correctly,
especially after a document has been reloaded. You have to preview the
document in a browser to see exactly what you have. Remember, Composer
is WYSI-almost-WYG.
Conclusion
I've given you the tools you need to start making web pages and I've taken
away your excuses. I've hidden them in my secret trash cache, guarded by
a genuine fire-breathing dragon. You decide if it's a fair trade. But don't
come 'round looking for them. The dragon is well fed (yummmm... excuses)
but still hungry; she doesn't need dessert. So go ahead and build that
website you've been fantasizing.
.
Back to Part
1: Introduction


 Colors
and Background tab: Selects default text and background colors (for
normal text, links, etc.). You can use a color or an image for the background.
A background image is illustrated on the right; there is another in Tables,
below.
Colors
and Background tab: Selects default text and background colors (for
normal text, links, etc.). You can use a color or an image for the background.
A background image is illustrated on the right; there is another in Tables,
below.