Epson flatbed scanners: Perfection 2450 Photo
with a little about the Epson Perfection 3200:
by Norman Koren
|
|
 |
Goodby 2450, Hello 3200 | Introduction | Description | Image quality comparisons | Epson TWAIN 5 software
Workflow | Adjustments | Focus and spacing issues | Image sample | Conclusions
Related pages Part 2: Additional 2450 images from Steven Gilbert and Benjamin Kanarek
Impressions of the Epson 3200 by Norman Koren | Benjamin Kanarek | Guido Bruck
Additional user impressions of the 3200
| July 2007: I added another crop below of the Emigrant Basin rock/juniper scanned by an Epson 4870 in early 2007. It shows a huge improvement over the earlier Epsons-- and it's not even the current model (V700/V750). Epson scanners have come of age; they're better than ever. Apart from that, the scanner pages have fallen way behind. I capture images with a digital SLR and I spend most of my time developing Imatest software. | ||
| January 2005: My friend George Nyman
has published a Comparison
of the Epson 4870, the Epson 3200, and the Nikon 8000ED. (The Canon
9900F was also tested, but it flunked.) The 4870 comes out looking very
good: better than I expected— quite a
bit sharper than the 3200, though (unsurprisingly) not as good as the
8000ED. It looks like a very good
choice for scanning 4x5 film, where it has a true sweet spot. |
||
| November 2003: Photo-i has a deatiled review of the Epson 4870. It appears to be an excellent scanner— but I'm not convinced it's significantly sharper than the 3200. It suffers the same optical limitation. | ||
| December 2003: Epson has finally issued proper OS-X scan software for the Perfection 2450 Photo Scanner. You'll have to navigate their site because they make it difficult to link directly. (Thanks, Eric Rogers.) | ||
| November 2003: Photo-i has announced the new Epson 4870 (GT-X700 in Japan)— the 4800 dpi replacement for the 3200. Features: Digital ICE dust/scratch removal, Dmax = 3.8 (excellent for a flatbed), USB-2.0/IEEE 1394 interface, Silverfast SE6. Impressive as far as it goes, but will it be sharper than the 3200? Flatbeds seem to be limited by the need for the lens to cover an 8.5 inch field (vs. about 1.7 inches for 35mm lenses). A brief test report by Andreas Schmidt seems to confirm my suspicions that the 4870 offers no real resolution gain over the 3200. Epson makes excellent products that offer good value to the consumer, but their 4800 dpi claim is a scam. | ||
| Perttu Luukkanen of Finland had published a detailed review of the Epson 3170. | ||
|
||
| October 2003: The Epson 3170 has been announced with similar specifications to the 3200, but at half the price. The only significant hardware difference is the size of the transparency unit: 2.6x9" vs. 4x9" for the 3200— wide enough for medium format but not for 4x5. Nothing in the specs indicates that the 3170 will have lower quality than the 3200. (I think it will come with less software.) It looks like a very good buy. I don't plan to get one myself, but I'll be happy to add user comments and links. | ||
| May 2003: I've put up my initial impressions of the Epson 3200 on the same page as impressions by Benjamin Kanarek and Guido Bruck. | ||
| October 2002: I've put up a new gallery of medium format images, scanned with the 2450. |
|
The 2450 hs been replaced by the 3200, which is very similar. Most comments about the 2450's performance apply to the 3200. The TWAIN 5 software has, however, been replaced.
I recommend reviews by Philip Harle and Steve's Digicams. Ken Rockwell's review of the 1640SU is worth checking out. But take his comments about the 2450 with several grains of salt. He doesn't actually have one. Tony Gillilan's brief review has interesting comparisons with the Nikon Super Coolscan 4000 and Tango drum scanner, but his comparison with the 1640SU shows less difference than I found, probably due to unit-to-unit variation.
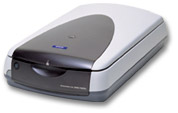 The
Epson Perfection 2450 is a flatbed scanner capable of scanning
reflected
images (prints) up to 8.5x11.7
inches
(216x297 mm) and transparencies
(film—
slides or negatives) up to 4x9
inches.
The cover contains a Transparency Unit (TPU), i.e., a diffuse light
source.
The light source is covered for scanning prints; the cover is easily
removed
for scanning transparencies. Dmax is rated at 3.3. It supports 48-bit
color
scanning. Optical resolution is 2400x4800
dpi, but realistically, 2400 dpi is the highest practical scan
resolution.
There is no advantage to going higher. It has USB 2.0 and IEEE 1394
(Firewire)
interfaces. It comes with holders for 35mm slides, 35mm film, medium
format
up to 6x9 cm and 4x5
in. If you want to take advantage of the 4x9
inch area— for example with 6x17 cm
(2.2x6.7 in) panoramic images,
you'll
have to make your own holder. Be sure not to cover the 0.4x4.25 inch
calibration
area— the slot at the end of the holders. It comes with two sacnning
software
packages: Epson TWAIN 5, which supports 16/48-bit scans, and Silverfast
SE, and it is compatible with Vuescan.
The
Epson Perfection 2450 is a flatbed scanner capable of scanning
reflected
images (prints) up to 8.5x11.7
inches
(216x297 mm) and transparencies
(film—
slides or negatives) up to 4x9
inches.
The cover contains a Transparency Unit (TPU), i.e., a diffuse light
source.
The light source is covered for scanning prints; the cover is easily
removed
for scanning transparencies. Dmax is rated at 3.3. It supports 48-bit
color
scanning. Optical resolution is 2400x4800
dpi, but realistically, 2400 dpi is the highest practical scan
resolution.
There is no advantage to going higher. It has USB 2.0 and IEEE 1394
(Firewire)
interfaces. It comes with holders for 35mm slides, 35mm film, medium
format
up to 6x9 cm and 4x5
in. If you want to take advantage of the 4x9
inch area— for example with 6x17 cm
(2.2x6.7 in) panoramic images,
you'll
have to make your own holder. Be sure not to cover the 0.4x4.25 inch
calibration
area— the slot at the end of the holders. It comes with two sacnning
software
packages: Epson TWAIN 5, which supports 16/48-bit scans, and Silverfast
SE, and it is compatible with Vuescan.
|
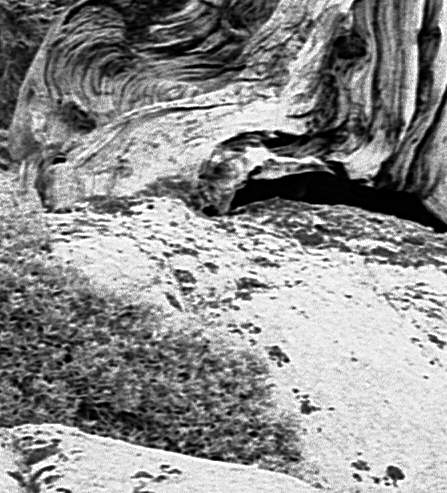
One paper you just published, Epson flatbed scanners 1640SU Photo and 2450: comments on image sharpness, though, doesn't show the kind of results I'm getting with my 2450 (my most recent purchase, just two weeks ago, and about the most fun I've had in the "darkroom" in ages).Since Dennis lives in nearby Fort Collins, we arranged to get together. He brought down his 2450 and I scanned of one of my best B&W negatives: an image of a rock and juniper taken in 1978 in California's Emigrant Basin Wilderness. Technical details: Hasselblad 500C, 80mm f/2.8 Zeiss Planar (one of the finest lenses ever made) at f/11 or f/16 ( guessing from the depth of field), Ilford FP-4 developed in Edwal FG7 diluted 1:15 in a 9% sodium sulfite solution (my standard technique in those days). The full image and 1:1 crops of the 2400 dpi 2450 scan and the1600 dpi 1640SU Photo scan are shown below. Both images have been sharpened— The 2450 image was sharpened during the scan: the Unsharp Mask box in the Epson TWAIN 5 driver was checked. The 1640SU image was sharpened afterwards in the image editor. I usually perfer the latter technique since it allows me to set a sharpening threshold and mask out skies. But the 2450 is pretty soft without sharpening, so it doesn't usually hurt to sharpen during the scan.A friend in New Hampshire (formerly a friend and business partner in a freelance photo business on the west coast) bought a 2450 just before Christmas, and has been sharing images with me. I noticed his images looked very nice, great color, almost grainless skies on 35mm images, but were a bit soft. His 4x5 images looked spectacular. Some other reports I'd read on the 2450 also indicated it was a fine little scanner, but yielded images on the soft side, especially for 35mm. When I went and looked at one (Circuit City) I realized it has a diffusion light source, unlike most film scanners I've used (I have the HP S20 and a Kodak RFS 3600 and have used a couple of others). Most film scanners have very collimated light sources and, like a condenser enlarger, produce "sharper looking", more contrasty images than a diffusion light source in the same enlarger (my Durst L1000 has three different light sources, from full diffusion to very collimated). I wondered if this might be the cause of soft looking images.
So, of course I bought a 2450 to find out. I figured it would never replace a dedicated film scanner for 35mm, but I have lots of 6x6, 6x7, 6x9 and some 4x5 negatives and chromes from the past 40 years that I haven't been able to edit and print in my digital lab. My first tests, simple comparisons of scans from the HP S20 and Epson 2450 at 2400 dpi, seem to indicate that the diffusion lighting is the cause of a slight softness, and a small amount of unsharp-masking brings out the detail in 2450 scans comparable to what I get with the HP. In fact, some parts of the images look a bit sharper in the 2450 scans, others look a little sharper in the S20 scans.
[NLK's comments. I believe the reason for the softness is large area the scanner lens has to cover (at least 4 inches when the TPU is activated) and the small aperture diffraction-limited optical system, which has a large depth of field, not the diffuse light source, which reduces the visible effect of scratches and helps a bit with dust, but has no effect on sharpness. Scans from my HP S20 have always been sharper than the 2450.]
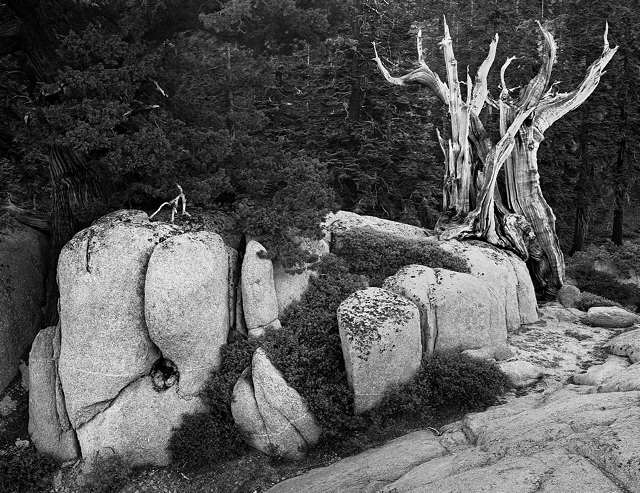
Emigrant basin rock/juniper: Full image reduced to 640 pixels
horizontally.
 |
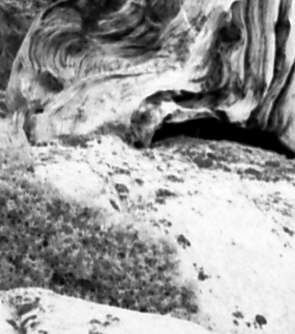 |
The difference is anything but subtle. I never used the 1640SU much because it didn't do justice to my medium format images. I compared a print from the 2450 to an 11x14 inch print made with my best technique on a diffusion enlarger with a 105mm El Nikkor enlarging lens, viewed under a Schneider 4x loupe. The darkroom print is just slightly sharper. Hardly noticeable to the naked eye. The image below was scanned at 3200 DPI with the Epson 4870 (not a current model), and added to this page in 2007. The improvement over the 2450 is dramatic.

Epson 4870 scan @ 3200 dpi, sharpened (added in 2007).
The next step up from the 2450 is the 4000 dpi Nikon Super Coolscan 8000 ED or the 4800 dpi Minolta DiMAGE Scan Multi Pro (which may interpolate to get 4800 dpi with medium format). Both are dedicated film scanners for formats up to 6x9 cm; both cost around $3,000, and both are superior to the 2450, but the difference will only be significant on images larger than 13x19 inches. I'm reluctant to part with that kind of money to scan images in a format I'm not actively using, particularly since 13x19 inches is the largest I can print. I'm refurbishing my Hasselblad system (body with four lenses). (I considered purchasing a Pentax 645NII system, which has an excellent 45-85mm zoom lens (equivalent to 28-54mm for 35mm), but I was reluctant to spend the money since digital cameras are starting to approach medium format quality and the Pentax body can't be adapted to a digital back— not that I could afford one in the next two years.)
Documentation - The printed 2450 instructions, "Scanner basics," has very little information on using TWAIN 5. Detailed instructions can be found in the PF 2450 PHOTO Guide, an HTML manual designed for web browser viewing that installs with the Epson software. Click Start, Programs...,Epson, PF 2450 PHOTO Guide, then in the browser window click on Scanning from the Manual Mode.
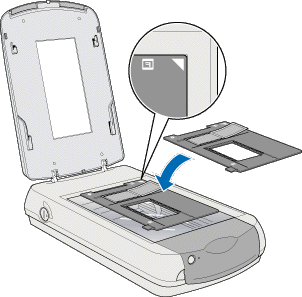 Insert
the film in the holder emulsion (dull) side up (reversed from what you
do in an enlarger). Place the holder in the scanner. The medium format/4x5
film holder is shown on the right.
Insert
the film in the holder emulsion (dull) side up (reversed from what you
do in an enlarger). Place the holder in the scanner. The medium format/4x5
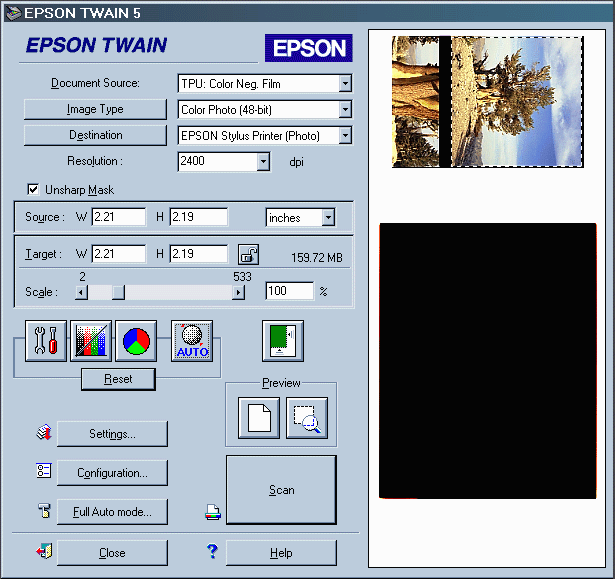
film holder is shown on the right.Document Source: Flatbed TPU: Color Neg. Film, TPU: Monochrome Neg. Film (B&W negative), TPU: Pos. Film (slides; reversal film). Choose the correct setting.
Image type: Color Photo, Color Photo (48-bit), etc. For best image quality I recommend 48-bit color or 16-bit B&W if your image editor can support it. See the PF 2450 PHOTO Guide for information on custom settings.
Destination: Opens a
dialog
box that affects scan resolution. You should save custom settings
because
the standard settings are for scanning documents at relatively low
resolution,
and most film scans should be done at 2400 dpi. I set both Color and
B&W
at 2400 dpi and save the setting with the name, Hi
res film scan.
.
| Resolution: You
should almost
always scan film at 2400 dpi. Why? Because there is no benefit from
scanning
at higher resolution— the 2450 can't resolve it. But if you scan at low
resolution, you sample every n(th) position. For example, if you scan
at
300 dpi, you sample every 8th position. This makes the scan go much
faster, but it can lead to grain
aliasing— a nasty effect. If you don't need a huge 2400 dpi scan (a
2400 dpi scan of 4x5 film in 48-bit color is 690 MB), you're best off
scanning
at 2400 dpi, then resizing down with your image editor.
The images on the right are small crops displayed 1 screen pixel per image pixel. One was scanned at 300 dpi; the other was scanned at 2400 dpi, resized down by a factor of 8, then sharpened. The image was made on 1974 Kodacolor— a much grainier emulsion than today's successor. |
 |
 |
Source, Target, Scale
I generally set Scale at 100% and
ignore
the rest. Always check the Scale
setting. It has a curious way of going off 100% and creating
monster files. See the PF 2450 PHOTO Guide.
| Tone and color adjustments There are four of them, shown on the right, numbered 1 through 4. 1is Image controls, which allows you to adjust highlights, shadows and gamma. Image Controls settings are altered by the AUTO button 4 and whenever the crop is changed. 2 is Tone Correction, which allows adjustment of R, G, B or composite curves. The adjustments can be saved. 3 is Color Adjustment, which can be used for adjusting gray balance (with an eye dropper) and saturation. | . | 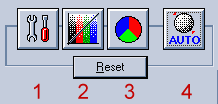 |
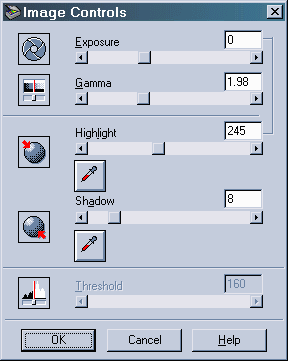
| Image Control 1
is the most important of these adjustments. You'll almost certainly
want
to look at it each time you scan. The goal is to preserve detail in the
shadows and highlights. This is not guaranteed with the default
settings,
which appear after the image is cropped or you click AUTO.
The default setting for Shadow is
8;
0 to 60 is available. The default setting for Highlight
is 245; 61 to 490 is available. Hightlight is linked to Exposure, which
defaults to 0; -10 to 20 is available. All tones under the Shadow
setting
are pure black and all tones above the Highlight setting are pure
white.
But the exact meaning of these settings is unclear. If you press Reset in the Epson TWAIN dialog box (above), the image appearance changes, but the Image Control settings remain unchanged. 8-bit numbers range from 0 to 255. Why 490? In my workflow, after I crop the image or click AUTO, I adjust Shadow so no shadow detail appears to be lost. I usually set it somewhere below 8; the image appears washed out if go all the way to 0. I usually increase Highlight to somewhere above 300, depending on the image appearance. Some highlight detail can be lost at the default setting of 245. A histogram would bevery helpful with these settings. Gamma adjusts the middle tones. |
. |  |
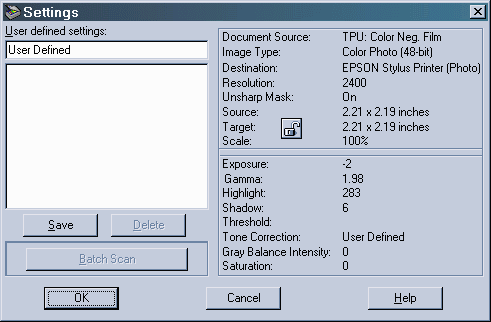
| Settings:
Shows you
a summary of your settings, which you can save or load.
Configuration: Allows you to control aspects of the scanner operation. Contains three tabs: Preview, Color and Other. Preview: Automatic Preview starts a preview scan whenever Epson TWAIN is started. I leave it unchecked. Automatic Thumbnail Preview for Film: Checked: Cropping is determined automatically. You may lose small amounts of the image near the edges. Unchecked: You must crop manually; you'll probably want to do a zoom scan. Try it both ways. A matter of personal preference. Mine is usually unchecked. If the Preview image is cropped incorrectly— if underexposed portions of slides are cut off, uncheck Automatic Thumbnail Preview for Film.Color: One of three is checked. Color Controls is my usual setting for scanning film. ICM allows you to select an ICC scanner profile from a list. No Color Correction is appropriate when an ICC profile is applied in the image editor. Other: I check Preserve Preview Settings and (if allowed) Perserve Preview Image. |
. |  |
I recently did several tests on my new Epson 2450 Photo scanner to find out where it is focused— on the glass or above it in the transparency holders. To my great surprise I found that both transparency film and reflective copy are in sharpest focus if they are between 1/16" and 1/8" above the glass!I did two tests, both at the maximum optical resolution of 2400 ppi. The upper image, scanned as a transparency, consists of chips of Kodak Tri-X, showing the edge of an exposed area (sky) and unexposed film, with a scratch across the film. I used Tri-X, a B&W negative film, because the grain shows the sharpness quite nicely. The image was scanned as a positive to make the exposed area middle gray.
The lower image, scanned as reflective copy, consists of pieces of a textured cardboard with pencil and pen marks. Starting with the first chip directly on the glass, each subsequent chip (6 in each of the tests) was raised above the glass in steps of 3/64". (I chose 3/64" because it is close to the thickness of the plastic transparency holder that comes with the scanner.) The images spaced at 3/32" are clearly the sharpest in each test.
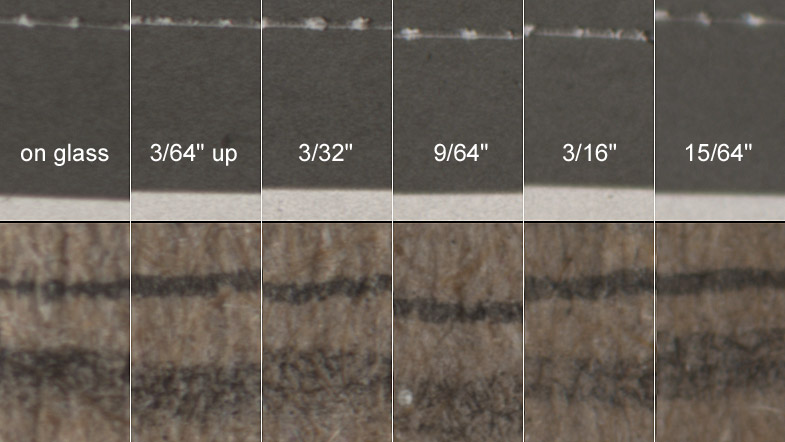
Since doing the test I have attached a piece of card to the bottom of my transparency holders so that the film is close to 3/32" above the glass. This undoubtedly increases the sharpness of my film scans.I did some tests on my 2450 with strips of thin board under the film holder, and found that my focal point was closer to the glass than Richard's— 3/32" total spacing looked fuzzy. Then Richard sent me his test image with 1/24" spacing steps. The second and third steps were the sharpest, so I guess the ideal focus is between them— about 3/48 = 2/32"— definitely closer to the glass than Richard's scanner and closer to the ideal focus, which would be about 1/32" (slightly less than the film holder spacing).
The variation in focal point from scanner to scanner may account for
some of differences I noticed before I purchased mine. I recommend
doing
some tests, particularly if you aren't satisfied with the sharpness
you're
getting. Richard's scanner is definitely out of spec— but it's easy to
compensate when you're scanning film.
Image
sample
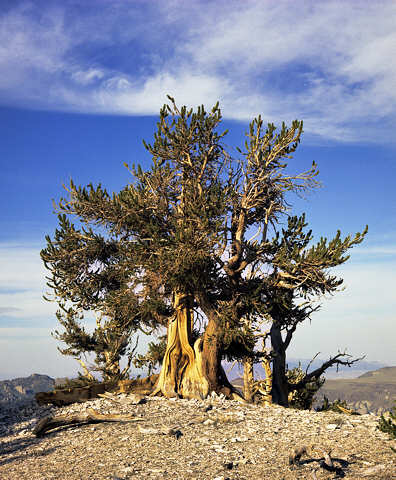
The bristlecome
pines in California's White-Inyo Mountains, near the Nevada border
east of the Sierras, are the oldest living things on earth— up to
4,700 years old. Growing at timberline—
around 11,000 feet— in a
harsh, arid climate with frigid, windy winters toughens these trees and
turns their many scars into artworks of transcendent beauty.
I took a series of images in 1974 using
a Rolleiflex
2.8F Planar, which I regret
selling. The film was the Kodacolor of the day— much softer and grainier
than today's successors. The 2450 does a great job of scanning the
negatives.
The image on the right has been edited with Picture
Window Pro and resized from the 4273x5177
pixel original, which has plenty of detail for a 13x19
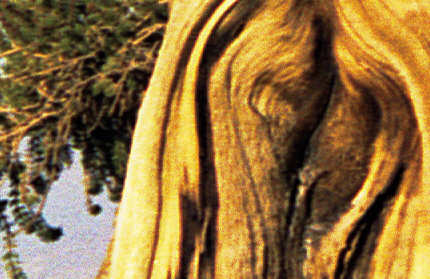
inch print. Grain is clearly visible in the 1:1 crop, below. I scanned
with Epson TWAIN 5 with unsharp mask checked. Might have been a mistake
with this old, grainy negative, but I can always blur the sky if the
grain
bothers me.
|
 |
 |

| Images and text copyright © 2000-2013 by Norman Koren. Norman Koren lives in Boulder, Colorado, where he worked in developing magnetic recording technology for high capacity data storage systems until 2001. Since 2003 most of his time has been devoted to the development of Imatest. He has been involved with photography since 1964. |  |